
Seat Leon >> Jump start
Introduction
Due to technical design reasons, tow starting or push starting your vehicle is strictly prohibited and not allowed.
If the engine on your Seat Leon fails to start because of a flat or discharged 12-volt vehicle battery, the battery can be safely connected to the battery of another donor vehicle using jumper cables to start the engine.
Jumper leads complying with the stringent DIN 72553 standard are required for a safe jump start (always consult and follow the cable manufacturer's instructions). The minimum cross-sectional area of the copper cable must be at least 25 mm squared for petrol engine variants and at least 35 mm squared for diesel engine variants.
Always verify that the jumper cable features fully insulated terminal clamps and that the protective insulation is entirely free of cuts, wear, or defects.
CAUTION To avoid causing severe and expensive damage to the sensitive vehicle electrical system and control units of your Seat Leon, take careful note of the following safety rules:
- If the jumper cables are connected incorrectly or in the wrong sequence, a dangerous electrical short circuit will occur.
- Use exclusively jumper leads equipped with fully insulated terminal clamps to prevent accidental arcing.
- Do not allow the two vehicles to touch or come into physical contact with each other, otherwise electrical current may begin to flow the moment the positive poles are connected.
NOTICE The high-voltage hybrid-vehicle system architecture on electrified models is not designed or authorized to provide a jump start to another vehicle. Attempting to do so may damage your Seat Leon's electrical and charging system.
In vehicle versions where the 12-volt battery is housed inside the passenger compartment or luggage compartment, jumper leads must always be connected exclusively to the designated positive and negative jump-start connection points provided in the engine bay.
Jump start connection point
Dedicated connection points are provided directly in the engine compartment of your Seat Leon for safe jump-starting procedures:
Jump start connection point, positive (vehicles with battery inside the passenger compartment or luggage compartment only)
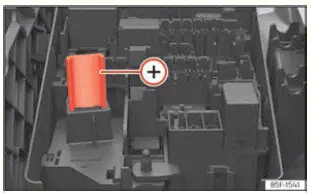
Fig. 216 In the engine compartment under the
fuse box cover: positive connection point.
 The jump start connection point (positive terminal) is used for attaching the red positive jumper lead securely.
Jump start connection point, negative
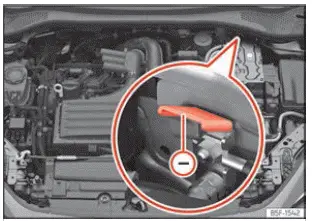
Fig. 217 In the engine compartment, right-hand
side, next to the water box: negative connection
point.
 The jump start connection point (ground) is used to connect the black negative jumper cable to complete the circuit.
Jump start: description
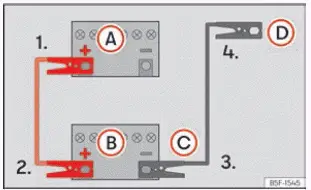
Fig. 218 Wiring diagram for vehicles without a
start/stop system
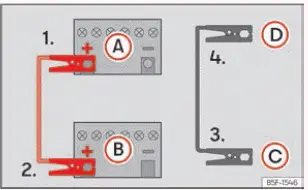
Fig. 219 Wiring diagram for vehicles with a start/
stop system.
- Positive terminal of your Seat Leon with the discharged battery.
For vehicle versions where the battery is housed in the luggage compartment, always use the dedicated jump-start connection point provided in the engine bay.
- Positive terminal of the donor vehicle supplying the electrical current.
- Negative terminal or suitable earth grounding point of the vehicle providing the jump start.
- Dedicated earth grounding point of the vehicle receiving the jump start.
The discharged 12-volt battery must remain properly and securely connected to the vehicle's onboard electrical network.
Always ensure that the terminal clamps make firm, direct metal-to-metal contact when attaching them to the battery poles or earth points.
Wearing protective gloves and safety eye wear is strongly recommended before commencing any work on or around the 12-volt vehicle battery.
If the discharged 12-volt battery is equipped with an optical test indicator (magic eye / sight glass), check the internal electrolyte status and level.
Jump lead terminal connections
The jumper leads must always be connected in the strict chronological sequence 1 > 2 > 3 > 4 ››› Fig. 218, ››› Fig. 219.
1. Switch off the ignition completely on both vehicles.
2. Connect one end of the red jumper lead to the positive terminal or dedicated engine bay connection point  of your Seat Leon with the discharged battery A.
3. Connect the other end of the red jumper lead to the positive terminal  in the donor vehicle providing the jump start B.
4. For vehicles without a Start-Stop system: connect one end of the black jumper lead C to the negative terminal  of the vehicle providing the current ››› Fig. 218.
For vehicles equipped with a Start-Stop system: connect one end of the black jumper lead C to a suitable ground terminal, to a solid piece of metal bolted to the engine block, or directly to the engine block itself ››› Fig. 219.
5. Connect the other end of the black jumper lead D to a suitable ground terminal, a solid metal component bolted to the engine block, or directly to the engine block of the vehicle with the flat battery. Never connect this clamp to a point directly next to or on the battery.
6. Route and position the jumper leads carefully so that they cannot come into contact with any moving or rotating parts within the engine compartment.
Starting
1. Start the engine of the donor vehicle supplying the current and leave it running at a steady idle speed.
2. Start the engine of your Seat Leon with the previously discharged battery and allow it to run for 2 to 3 minutes until the engine settles into a smooth idle.
Disconnecting the jump leads
1. Before disconnecting the jumper cables, switch off the dipped beam headlights if they happen to be turned on.
2. Turn on the interior heating fan and the vehicle's heated rear window on the car with the discharged battery. This electrical load helps to absorb and reduce any sudden voltage peaks that can occur while disconnecting the battery terminals.
3. While both engines continue running smoothly, carefully disconnect the jumper cables in the exact reverse order of how they were originally connected.
If the engine fails to catch and start after 10 seconds of cranking, pause, wait for approximately 1 minute to let the starter motor cool, and then try again.
WARNING
- Always observe and follow the critical safety warnings referring to working around the engine compartment and high-voltage or electrical components.
- The booster battery supplying the current must have the identical nominal voltage (12 V) and a comparable capacity rating to the discharged battery. Failure to comply with this requirement could result in a dangerous explosion.
- Keep any potential sources of ignition—such as open flames, burning cigarettes, or sparks—safely away from the batteries at all times.
Ignition sources can easily trigger an explosion of flammable battery gases.
- Strictly observe the usage instructions provided by the manufacturer of the jump leads.
- On the vehicle receiving the boost, never connect the negative jumper cable directly to the negative terminal of the discharged battery. Any sparks generated could ignite the explosive hydrogen gas escaping from the battery and cause a severe explosion.
- The negative jumper wire must never be connected to fuel system components, fuel lines, or hydraulic brake lines on either vehicle.
- Never touch the uninsulated metallic parts of the battery pole clamps while connected. The jumper lead attached to the positive battery terminal must never touch metal components of the vehicle body, as this will cause an immediate electrical short circuit.
- Route and secure the jumper leads in such a way that they cannot be accidentally caught or snagged by any rotating belts or moving parts within the engine compartment.
- Never lean your upper body directly over the batteries during the jump-start procedure, as acid splashes or chemical reactions could cause severe burns.
- Carefully review and take into account the instruction manuals issued by both the jump lead manufacturer and the manufacturer of the donor vehicle.
- Before beginning any direct work on the 12-volt battery, touch a bare metal part of the chassis to discharge any static electricity from your body, avoiding sparks that could ignite battery gases.
CAUTION Never attempt to use jump leads when either of the 12-volt batteries is frozen solid. Extreme danger of explosion! Even after a frozen battery has thawed out, internal casing cracks and electrolyte leaks can cause severe chemical burns.
Always replace the battery immediately if it has been frozen.
NOTICE Once your Seat Leon has been successfully jump-started, drive directly to a qualified specialist workshop to have the 12-volt battery and charging system thoroughly tested and checked.
 Changing the windscreen wiper blades
Wiper service position
Fig. 214 Wipers in service position.
Before activating the maintenance routine, always ensure that the windscreen wiper blades are completely free and not frozen to the glas ...

See also:
Removing and installing tailgate seal
Special tools and workshop equipment required
Thrust piece - T20098-
Removing
Open the tailgate.
Pull seal -1- off body flange.
arrow-: vulcanised connection of the seal.
fitting
...
