Seat Leon >> Renewing bonded rubber bush for wheel bearing housing
SEAT Leon Service and Repair Manual / Running gear, axles, steering / Rear suspension / Wheel bearing, trailing arm / Renewing bonded rubber bush for wheel bearing housing
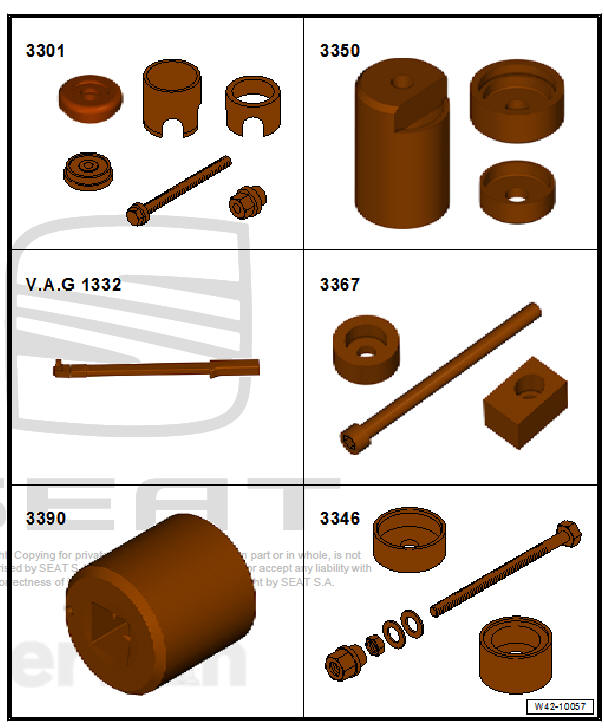
Special tools and workshop equipment required
- attachment tool - 3301-
- attachment tool - 3350-
- Torque wrenches - V.A.G 1332-
- Viscous fan fitting tool - 3367-
- Actuating arm - 3390-
- attachment tool - 3346-
Removing
- Loosen wheel bolts.
- Raise vehicle.
- Undo the wheel.
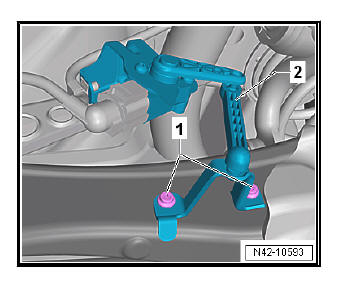
Vehicles with vehicle level senders
- Remove bolts -1-.
- Remove retainer for rear left vehicle level sender -2-.
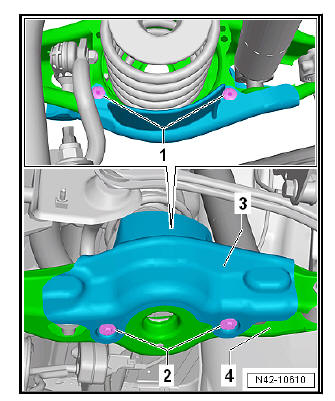
Vehicles with stone deflector
- Remove spreader rivets -1-.
- Remove bolts -2- for stone guard -3-.
Continuation for all models:
- Remove the springs.
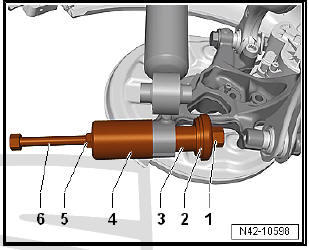
Pressing out bonded rubber bush
- - Nut - 3346/3-
- - Thrust plate from assembly tool - 3301-
- - Actuating arm - 3390-
- - Sleeve from assembly tool - 3350-
- - Nut
- - Spindle - 3346/2-
- Pull out bonded rubber bush by turning nut - 3346/3- -1-. When doing this, counterhold spindle - 3346/2- -6-.
Insert the bonded rubber bush
Note
- When pulling in, make sure that the tip of the spindle - 3301/1- does not stick to the wheel bearing housing.
- Do not use lubricant.
- Insert bearing carefully so it does not cant.
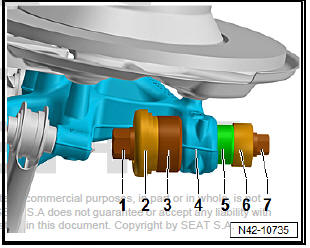
- - Nut from assembly tool - 3301-
- - Thrust plate from assembly tool - 3301-
- - Thrust piece from assembly tool - 3346- , with open side facing towards wheel bearing housing
- - Wheel bearing housing
- - Bonded rubber bush
- - Press tool - 3367/2-
- - Spindle - 3301/1-
- Pull in bonded rubber bush just far enough that it is positioned right in front of wheel bearing housing by turning nut - 3301- -1-. When doing this, counterhold spindle - 3301/1- -7-.
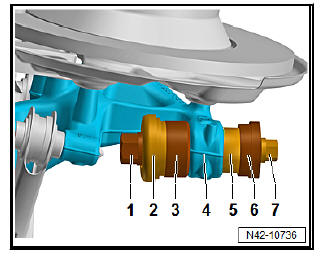
- Remove tools, and fit them again as shown in illustration.
- - Nut from assembly tool - 3301-
- - Thrust plate from assembly tool - 3301-
- - Thrust piece from assembly tool - 3346- , with open side facing towards wheel bearing housing
- - Wheel bearing housing
- - Press tool - 3367/2-
- - Press tool - 3301/2-
- - Spindle - 3301/1-
- Pull in bonded rubber bush to stop by turning nut - 3301- -1-.
When doing this, counterhold spindle - 3301/1- -7-.
Installing
The remaining installation steps are carried out in reverse sequence - note the following points:
Specified torques
- The threaded connections to the lower transverse link may only be loosened and tightened in the unladen weight position.
- On vehicles with vehicle level sender, carry out basic settings for wheel damper electronics - Vehicle diagnostic tester.
- On vehicles with vehicle level sender, carry out basic adjustment of headlights.
 Removing and installing wheel bearing
unit
Removing and installing wheel bearing unit, torsion beam axle
Special tools and workshop
equipment required
Fitting sleeve - 3241/4-
Wheel hub cover extractor -
VW 637/2-
Torque wrenches - ...
 Removing and installing trailing arm with
mounting bracket
Special tools and workshop equipment required
Torque wrenches - V.A.G 1332-
Engine elevator - V.A.G 1383 A-
Removing
Remove rear wheel on affected side.
Use tensioning straps - ...
See also:
Front windscreen wipers
The windscreen wiper lever controls the windscreen wipers
and the automatic wash and wipe.
Fig. 81 Windscreen wiper
and windscreen wash
lever
The windscreen wiper lever fig. 81 has the fo ...
