Seat Leon >> Assembly overview - suspension strut, shock absorber, spring
SEAT Leon Service and Repair Manual / Running gear, axles, steering / Rear suspension / Suspension strut, shock absorber,
spring / Assembly overview - suspension strut,
shock absorber, spring
Assembly overview - suspension strut, shock absorber, spring, torsion beam axle
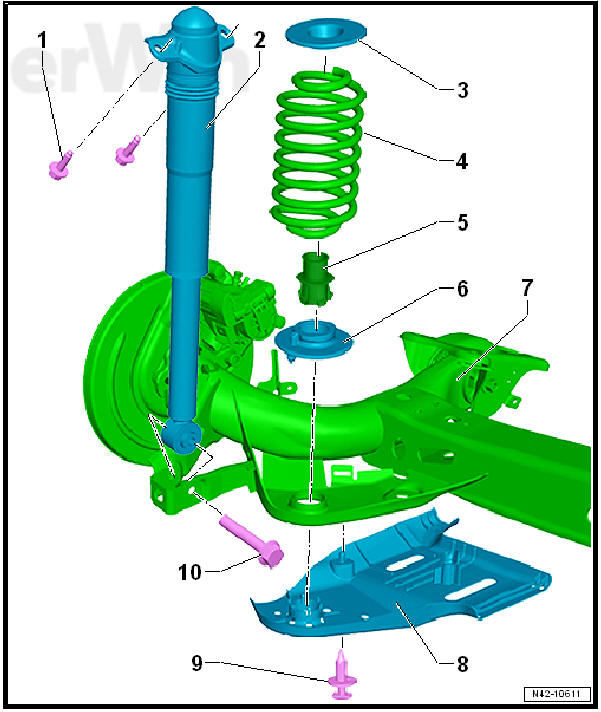
- - Bolt
- Always renew after removing
- 50 Nm +45º
- - Shock absorber
- Removing and installing
- Defective shock absorbers must always be degassed and drained before disposal
- - Upper spring seat
- Fit on "lug" on body.
- - Spring
- Removing and installing
- - Clamping ring
- After installing stone deflector, press clamp ring on so it is flush
- - Lower spring seat
- Turn end of spring against stop
- When installing, fit pin in aperture in spring mounting on axle beam.
- - Axle beam
- - Stone deflector
- - Expanding rivet
- - Bolt
- Always renew after removing
- Always tighten bolted connection with suspension in unladen position
- 70 Nm +180º
Assembly overview - suspension strut, shock absorber, spring, multi-link suspension

- - Bolt
- Always renew after removing
- 50 Nm +45º
- - Shock absorber
- Removing and installing
- Note correct installation position of cable tie fastener.
- Defective shock absorbers must always be degassed and drained before disposal
- - Upper spring seat
- Fit on "lug" on body.
- - Spring
- Removing and installing
- - Clamp
- Assists with installation
- - Lower spring seat
- Turn end of spring against stop
- When installing, fit pin into aperture in spring mounting on lower transverse link -arrow-.
- - Lower transverse arm
- - Nut
- Always renew after removing
- Always tighten bolted connection with suspension in unladen position
- 70 Nm +180º
- - Bolt
- Always renew after removing

 Shock absorber: removing and fitting
Removing and installing shock absorber, torsion beam axle
Special tools and workshop
equipment required
Torque wrenches -
V.A.G 1332-
Torque wrenches - V.A.G
1410-
Spring tensor - V.A.G
...
See also:
Installing and removing servomotor for
headlight range adjustment V48 / V49
Installing and removing servomotor for
headlight range adjustment V48 / V49,
halogen headlight
Special tools and workshop equipment required
Lever - U 30800-
Note
In the figures, the r ...
