Seat Leon >> Assembly overview - drive unit of air conditioner compressor
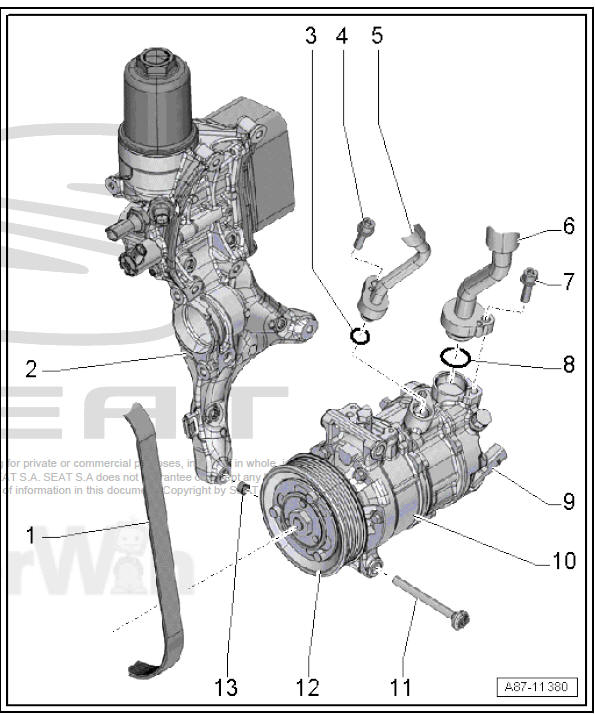
- - Poly-V belt
- Removal and installation
- Mark the direction of rotation and ensure that do not reverse it when installing
- - Bracket for ancillary mechanical
units
- Removal and installation
- - O-ring
- Moisten with refrigeration oil before fitting
- - Bolt.
- Tightening torque
- - Refrigerant line, high-pressure side
- - Refrigerant line, low-pressure side
- - Bolt.
- Tightening torque
- - O-ring
- Moisten with refrigeration oil before fitting
- - Air conditioner compressor regulating valve - N280-
- - Air conditioning compressor
- Detaching and attaching refrigerant pipe
- Removing and installing air conditioning compressor from and to bracket
- Removing and fitting
- - Bolt.
- 3 off
- 25 Nm
- - Pulley with overload safeguard
- Assembly overview
- - Dowel sleeves
- 2 off
Assembly overview - belt pulley
Pulley: Assembly overview, air conditioner compressor, Denso
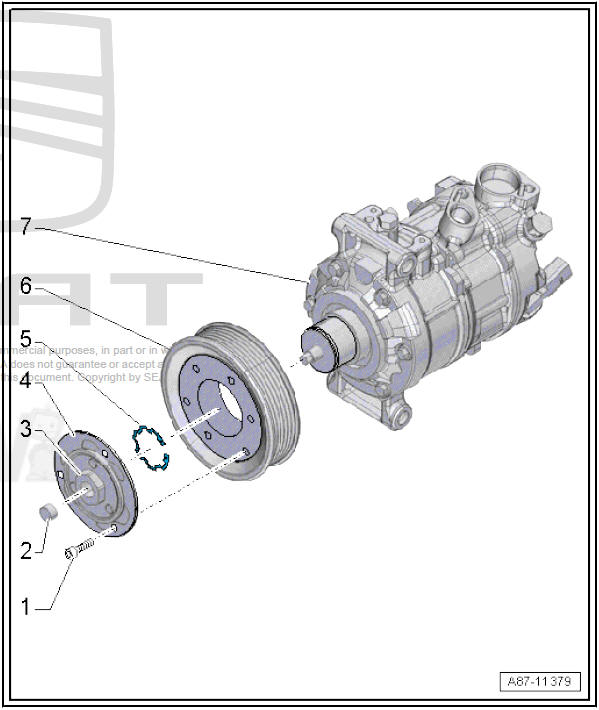
- - Bolt.
- 3 off
- 4.5 Nm
- - Cap
- - Nut
- 25 Nm
- - Drive plate
- With overload protection
device; triggered if
torque is too great (e.g.
if air conditioner compressor cannot rotate freely) causing pulley to free-wheel without driving air conditioner compressor
- With overload protection
device; triggered if
torque is too great (e.g.
- - Circlip
- Renewing.
- Ensure correct positioning - flat side facing air conditioner compressor
- - Pulley
- Removing and fitting
- - Air conditioning compressor
- The drive shaft for the air conditioner compressor must be cleaned before installing the pulley
Pulley: Assembly overview, air conditioner compressor, Sanden
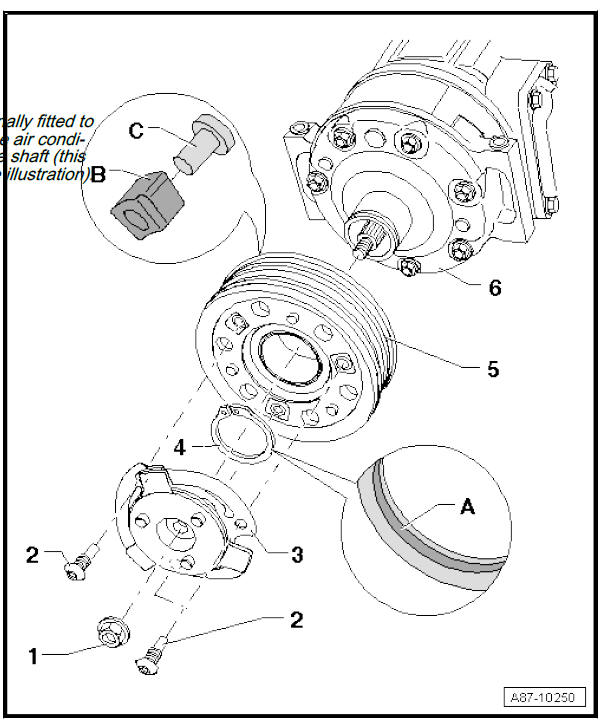
- - Nut
- 25 Nm
Note A plastic cap is additionally fitted to protect the thread of the air conditioner compressor drive shaft (this cap is not shown in the illustration).
- To unfasten and tighten the hexagon nut, hold the pulley in position with a commercially available oil filter strap wrench.
- Use a thread cutter for example to remove the locking fluid applied to the thread of the nut on screwing in. Otherwise there is a danger of the drive shaft shearing off on next removal.
- Use a wire brush to clean the thread of the air conditioner compressor drive shaft.
- Apply locking fluid when fitting the nut. Locking fluid.
- - Bolt.
- 12 Nm
- To unfasten and tighten the bolts, hold the pulley in position with a commercially available oil filter strap wrench.
- Threaded holes which take self-locking bolts or bolts coated with locking fluid must be cleaned (using a tap or similar). Otherwise there is a danger of the bolts shearing off the next time they are removed.
- Clean thread of bolts from remnants of locking fluid using wire brush. Then apply locking fluid and fit bolts. Locking fluid.
- - Drive plate
- With overload safeguard (attachment of spring elements); tripped in the event of excessive torque (e.g.stiff air conditioner compressor) and the pulley just free-wheels without driving the air conditioner compressor
- The spring elements of the drive plate dampen vibrations and reduce noise
- - Circlip
- Install in correct position; insertion bevel -A- facing away from air conditioner compressor (flat side shows towards compressor)
- - Pulley
- With rubber elements -B- and threaded plates -C- for isolating the pulley from the air conditioner compressor drive shaft, dampening vibrations and reducing noise.
Note
- Depending on the version, the threaded plates may also be linked by way of a ring.
- "Cold country" vehicles (e.g.
central and northern Europe)
may be fitted with air conditioner
compressors with a smaller capacity.
On these air conditioner compressors, the pulley is slightly different to the version shown here (e.g. no rubber elements -B-) .
- - Air conditioning compressor
- Clean the air conditioner compressor drive shaft before fitting the pulley.

 Detaching and attaching air conditioner
compressor at bracket
Detaching and attaching air conditioner
compressor at bracket
Special tools and workshop equipment required
Engine bung set - VAS 6122-
Removal:
Vehicles with TDI engine: Open the clamps -1- and -2-and
disconnect air intake hose.
Seal open lines ...
See also:
Additional brake lights
Assembly overview - high-level brake
light
Assembly overview - high-level brake light on spoiler
- Light tube for the rear window
wiper fluid
Version 1
Version 2
- Washer jet ...
