Seat Leon >> Assembly overview - interior monitor
SEAT Leon Service and Repair Manual / Electrical system / Lights, bulbs, switches - interior / Anti-theft alarm system / Assembly overview - interior monitor
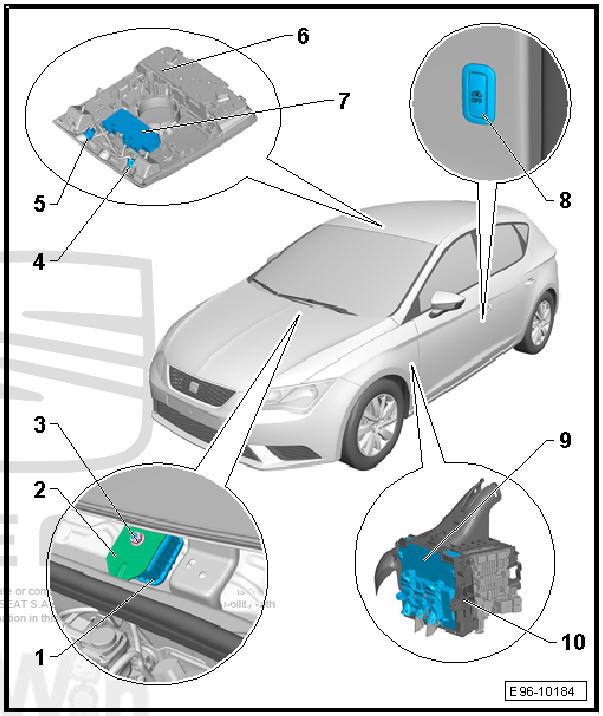
- - Alarm horn - H12-
- Removal and installation
- - Bracket for alarm horn -
H12-
- Retaining nuts, 7 Nm
- - Nut
- 7 Nm
- - Individual sensor for interior
monitor (left-side)
- Can only be renewed together with anti-theft alarm sensor - G578-
- Removal and installation
- - Individual sensor for interior
monitor (right-side)
- Can only be renewed together with anti-theft alarm sensor - G578-
- Removal and installation
- - Front roof module - WX3-
- Removal and installation
- - Anti-theft alarm system sensor
- G578-
- Removal and installation
- - Button deactivation of interior
monitor and vehicle tilt -
E616-
- Removal and installation
- - Onboard supply control unit - J519-
- With central locking and anti-theft alarm system aerial - R47-
- Assembly overview
- - Bracket/bearing/support
- for the onboard supply control unit
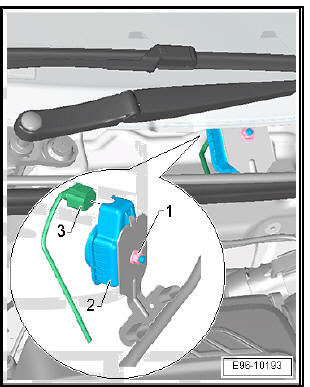
Alarm horn - H12- : removing and fitting
Removing
- Switch off ignition and all electrical consumers.
Vehicles without access and start authorisation system
- Remove ignition key, if fitted.
Vehicles with access and start authorisation system
- Store the ignition key outside the vehicle to prevent the ignition from being switched on unintentionally.
Continued for all vehicles
- Remove plenum chamber cover.
- Remove nut -1-.
- Remove the alarm horn -2- from the bracket.
- Pull out the plug -3-.
- Remove the alarm horn -2-.
Installing
Installation takes place in reverse order.

 Removing and installing anti-theft alarm
sensor - G578-
Removing and installing anti-theft alarm
sensor - G578-
Removing
Switch off ignition and all electrical consumers.
Vehicles without access and start authorisation system
Remove ignition key, if fitted.
Vehicles with access and start authorisa ...
See also:
Steel wheels
Clean steel wheels regularly using a separate sponge.
Use an industrial cleaner to remove brake dust. Any damage to the paint on
steel wheels should be repaired before the metal starts to rust.
W ...
