Seat Leon >> Exploded view of bumper cover
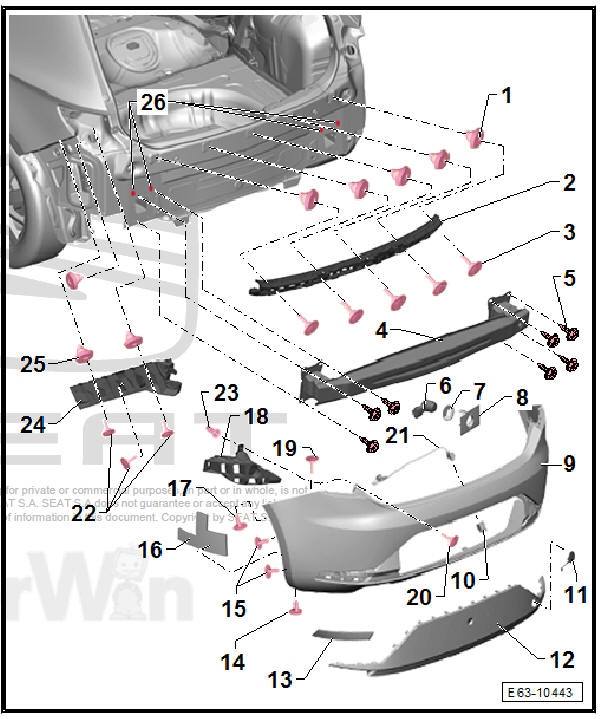
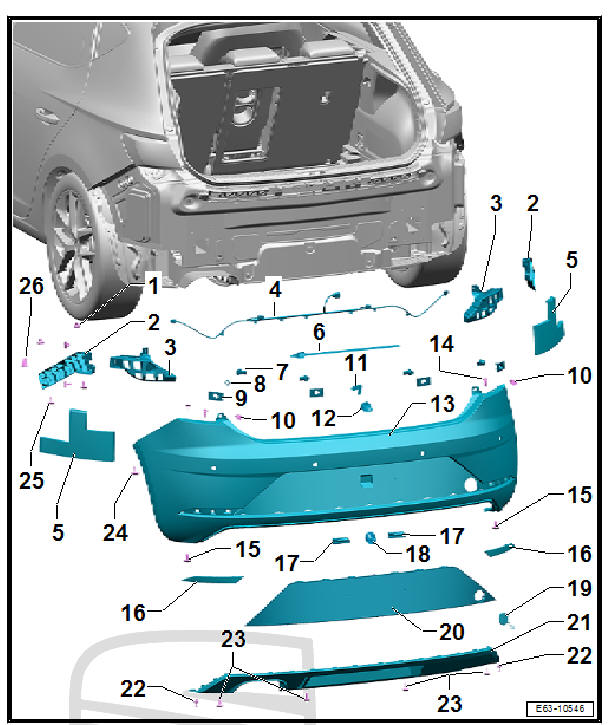
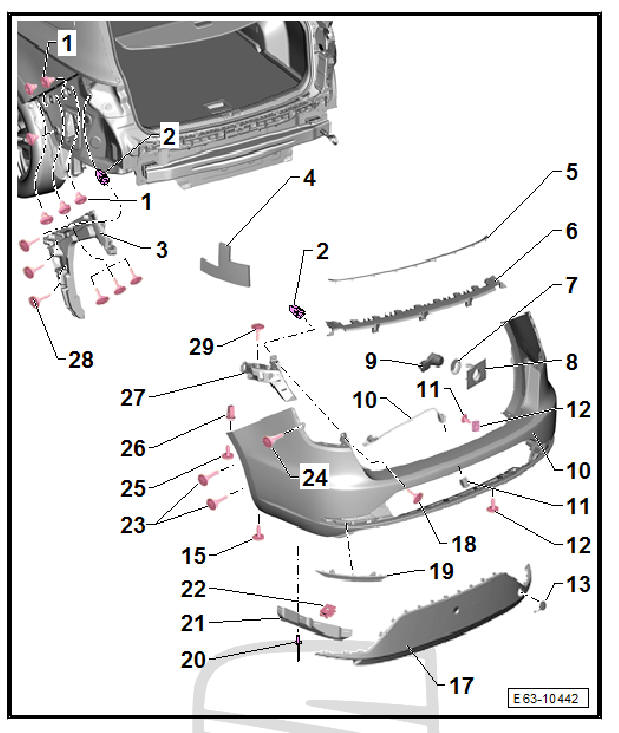
Rear bumper trim, three and five-door models: exploded view

- - Tight spreader block
- 5 off
| DANGER! Risk of ingress of exhaust fumes in the passenger compartment
|
- - Moulding attachment
- - Bolt.
- 5 off
- 2.5 Nm
- - Rear crossbeam
Removing
- Remove the bumper trim
- Remove screws -5-.
- Remove the rear cross member.
fitting
Fit in reverse order from removal, remembering the following:
- Ensure that cavity seal -28- is in place.
- - Bolt.
- 3 + 4 each
- 20 Nm
- - Sensor for rear steering parking aid
- - Sensor seal for the rear steering parking aid
- 4 off
- - Sensor holder for the rear steering parking aid
- 4 off
- - Quick locking nut
- - Rear view camera
- - Trailer hitch cover
- - Holder for rear view camera
- - Bumper trim
- Material: PP/EPDM
- - Lower spoiler (rear bumper):
Removing
- Remove the bumper trim.
- Clip the spoiler out of the bumper trim.
fitting
Installation is done in reverse order of removal operations.
- - Reflector
- Left and right.
- Remove using the lever - U30800-
- - Bolt.
- 3 + 3 each
- 2.5 Nm
- - Bolt.
- 2 + 2 each
- 2 Nm
- - Soundproofing sump
- 1 + 1 each
- - Bolt.
- 1 + 1 each
- 1.7 Nm
- - Support plate
- For bumper
- Fit into the guide profile -5- and into the securing strip -2-.
- - Bolt.
- 1 + 1 each
- 2.5 Nm
- - Clip
- With plastic screws
- Unscrew the screw to remove it
- - Guide profile
- Left-side
Removing
- Remove the bumper trim.
- Remove screws -24-.
- Remove the guide profile.
- Proceed in exactly the same manner to remove the guide profile on the other side.
fitting
Installation is done in reverse order of removal operations.
- - Bolt.
- 3 + 3 each
- 2.5 Nm
- - Bolt.
- 1 + 1
- 2 Nm
- - Tight spreader block
- 3 + 3 each
| DANGER! Risk of ingress of exhaust fumes in the passenger compartment
|
- - Spreader block
- 1 + 1 each
- - Cavity wax - AKR.308.SP5-
Note To prevent water penetration
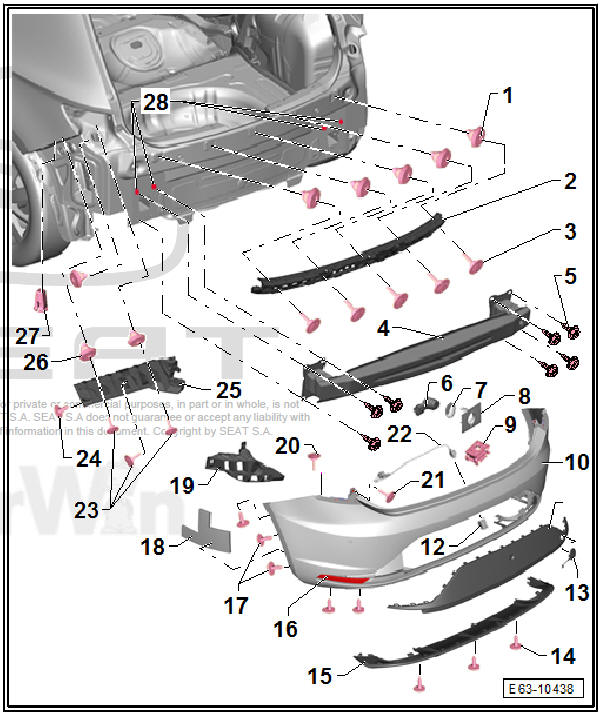
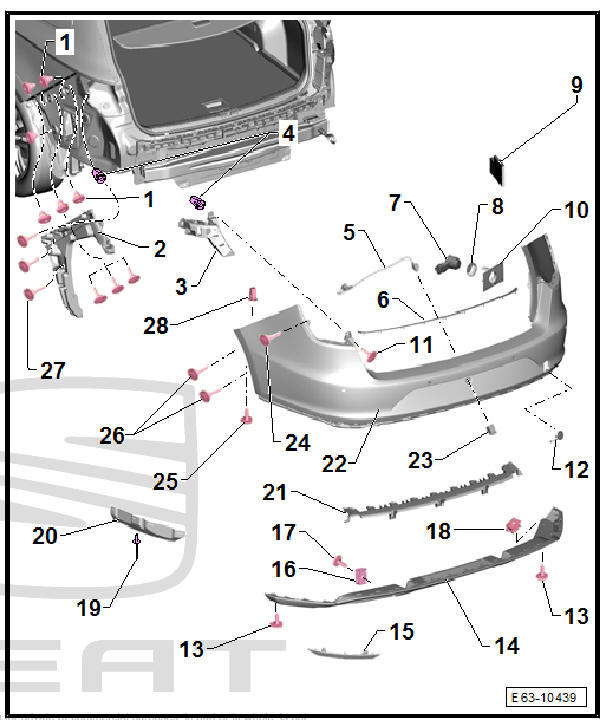
Rear bumper cover, version FR, 3 and 5 door: assembly overview
- - Tight spreader block
- 5 off
| DANGER! Risk of ingress of exhaust fumes in the passenger compartment
|
- - Moulding attachment
- - Bolt.
- 5 off
- 2.5 Nm
- - Rear crossbeam
Removing
- Remove the bumper trim.
- Remove screws -5-.
- Remove the rear cross member.
fitting
Fit in reverse order from removal, remembering the following:
- Ensure that cavity seal -26- is in place.
- - Bolt.
- 3 + 4 each
- 20 Nm
- - Sensor for rear steering parking aid
- - Sensor seal for the rear steering parking aid
- 4 off
- - Sensor holder for the rear steering parking aid
- 4 off
- - Bumper trim
- Material: PP/EPDM
- - Holder for rear view camera
- - Trailer hitch cover
- - Bumper cover
- - Reflector
- Left and right.
- Remove using the lever - U30800-
- - Bolt.
- 7 off
- 2.5 Nm
- - Bolt.
- 2 + 2 each
- 2.5 Nm
- - Soundproofing sump
- 1 + 1 each
- - Bolt.
- 1 + 1 each
- 2.5 Nm
- - Support plate
- For bumper
- Fit into the guide profile -22- and into the securing strip -2-.
- - Bolt.
- 1 + 1 each
- 2.5 Nm
- - Bolt.
- 1 + 1 each
- 2.5 Nm
- - Rear view camera
- - Bolt.
- 3 + 3 each
- 2.5 Nm
- - Spreader block
- 1 + 1 each
- - Guide profile
- Left-side
Removing
- Remove the bumper trim.
- Remove screws -23-.
- Remove the guide profile.
- Proceed in exactly the same manner to remove the guide profile on the other side.
fitting
Installation is done in reverse order of removal operations.
- - Tight spreader block
- 3 + 3 each
| DANGER! Risk of ingress of exhaust fumes in the passenger compartment
|
- - Cavity wax - AKR.308.SP5-
Note To prevent water penetration
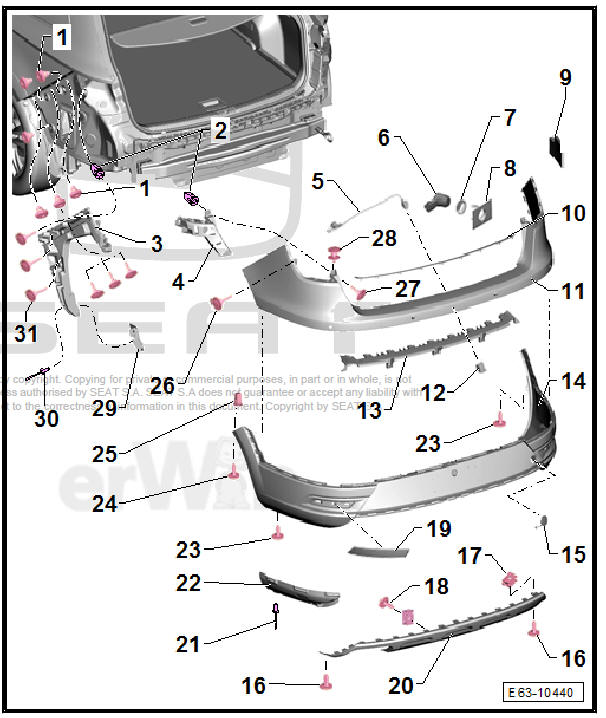
Rear bumper cover, version CUPRA, 3 and 5 door: assembly overview
- - Tight spreader block
- 5 off
| DANGER! Risk of ingress of exhaust fumes in the passenger compartment
|
- - Moulding attachment
- - Bolt.
- 5 off
- 2.5 Nm
- - Rear crossbeam
Removing
- Remove the bumper trim.
- Remove screws -5-.
- Remove the rear cross member.
fitting
Fit in reverse order from removal, remembering the following:
- Ensure that cavity seal -28- is in place.
- - Bolt.
- 3 + 4 each
- 20 Nm
- - Sensor for rear steering parking aid
- Removing and installing
- - Sensor seal for the rear steering parking aid
- 4 off
- - Sensor holder for the rear steering parking aid
- 4 off
- - Quick locking nut
- - Bumper trim
- Material: PP/EPDM
- - Bumper cover
- - Holder for rear view camera
- - Trailer hitch cover
- - Bolt.
- 7 off
- 2.5 Nm
- - Lower spoiler (rear bumper)
- - Reflector
- Left and right.
- Remove using the lever - U30800-
- - Bolt.
- 3 + 3 each
- 2.5 Nm
- - Soundproofing sump
- 1 + 1 each
- - Support plate
- - Bolt.
- 1 + 1 each
- 2.5 Nm
- - Bolt.
- 1 + 1 each
- 2.5 Nm
- - Rear view camera
- - Bolt.
- 3 + 3 each
- 2.5 Nm
- - Spreader block
- 1 + 1 each
- - Guide profile
- Left-side
Removing
- Remove the bumper trim.
- Remove screws -23-.
- Remove the guide profile.
- Proceed in exactly the same manner to remove the guide profile on the other side.
fitting
Installation is done in reverse order of removal operations.
- - Tight spreader block
- 3 + 3 each
| DANGER! Risk of ingress of exhaust fumes in the passenger compartment
|
- - Spreader block
- 1 + 1 each
- - Cavity wax - AKR.308.SP5-
Note To prevent water penetration.
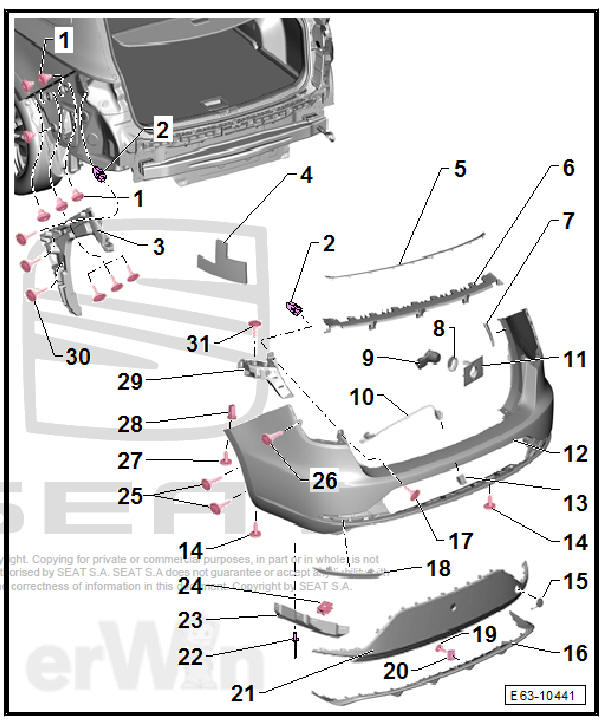
Rear bumper trim, CUPRA 2017 version - Assembly overview
- - Spreader block
- 1 + 1 each
- - Tight spreader block
- 3 + 3 each
| DANGER! Risk of ingress of exhaust fumes in the passenger compartment
|
- - Tight spreader block
- 5 off
| DANGER! Risk of ingress of exhaust fumes in the passenger compartment
|
- - Bolt.
- 4 + 4 each
- 2.5 Nm
- - Rear crossbeam
- - Moulding attachment
- - Bolt.
- 5 off
- 2.5 Nm
- - Wiring harness
- - Sensor holder for the rear steering parking aid
- 4 off
- - Sensor seal for the rear steering parking aid
- 4 off
- - Bumper trim
- Material: PP/EPDM
- - Clip
- 3 off
- - Number plate lights X4 / X5
- - Bumper cover
- - Trailer hitch cover
- - Bolt.
- 6 off
- 2.5 Nm
- - Lower spoiler (rear bumper)
- - Expansion rivet
- 1 + 1 each
- - Quick locking nut
- 6x
- - Reflector
- Left and right.
- Remove using the lever - 3409-
- - Holder for rear view camera
- - Bolt.
- 3 + 3 each
- 2 Nm
- - Rear wheel housing liner trim
- Connected to the inner side of the bumper trim with adhesive
- - Bolt
- 1 + 1 each
- 1.7 Nm
- - Bolt.
- 1 + 1 each
- 2.5 Nm
- - Bolt.
- 1 + 1 each
- 2.5 Nm
- - Rear view camera
- - Sensor for rear steering parking aid
- Removing and installing
- - Clip
- 1 + 1 each
- - Soundproofing sump
- 2 off
- - Bolt.
- 3 + 3 each
- 2.5 Nm
- - Guide profile
- - Support plate
- - Fixing block
- 1 + 1 each
Rear bumper cover, version Leon 2017 - assembly overview
- - Bolt.
- 3 + 3 each
- 2.5 Nm
- - Wiring harness
- - Support plate
- - Soundproofing sump
- 2 off
- - Bolt.
- 1 + 1 each
- 2.5 Nm
- - Sensor seal for the rear
steering parking aid
- 4 off
- - Sensor holder for the rear
steering parking aid
- 4 off
- - Sensor for rear steering
parking aid
- Removing and installing
- - Rear view camera
- - Sealing cap
- - Bolt.
- 1 + 1 each
- 2.5 Nm
- - Trailer hitch cover
- - Number plate lights X4 / X5
- - Holder for rear view camera
- - Bumper trim
- Material: PP/EPDM
- - Reflector
- Left and right.
- Remove using the lever - U30800-
- - Clip
- 2 off
- - Bolt.
- 4 off
- 2.5 Nm
- - Lower spoiler (rear bumper)
- - Bolt.
- 1 + 1 each
- 1.7 Nm
- - Bolt.
- 1 + 1 each
- 2.5 Nm
- - Clip
- With plastic screws
- Unscrew the screw to remove it
- - Bolt.
- 3 + 3 each
- 2.5 Nm
- - Wiring harness
- - Guide profile
- - Tight spreader block
- 3 + 3 each
| DANGER! Risk of ingress of exhaust fumes in the passenger compartment
|
- - Spreader block
- 1 + 1 each
Rear bumper cover, version FR Leon 2017 - assembly overview
- - Tight spreader block
- 3 + 3 each
| DANGER! Risk of ingress of exhaust fumes in the passenger compartment
|
- - Guide profile
- - Support plate
- - Wiring harness
- - Soundproofing sump
- 2 off
- - Wiring harness
- - Sensor for rear steering
parking aid
- Removing and installing
- - Sensor seal for the rear
steering parking aid
- 4 off
- - Sensor holder for the rear steering parking aid
- 4 off
- - Bolt.
- 1 + 1 each
- 2.5 Nm
- - Sealing cap
- - Rear view camera
- - Bumper trim
- Material: PP/EPDM
- - Bolt
- 1 + 1 each
- 2.5 Nm
- - Bolt.
- 1 + 1 each
- 2.5 Nm
- - Reflector
- Left and right.
- Remove using the lever - U30800-
- - Number plate lights X4 / X5
- - Holder for rear view camera
- - Trailer hitch cover
- - Bumper cover
- - Lower spoiler (rear bumper)
- - Clip
- 2 off
- - Bolt.
- 4 off
- 2.5 Nm
- - Bolt.
- 1 + 1 each
- 1.7 Nm
- - Bolt.
- 3 + 3 each
- 2.5 Nm
- - Spreader block
- 1 + 1 each
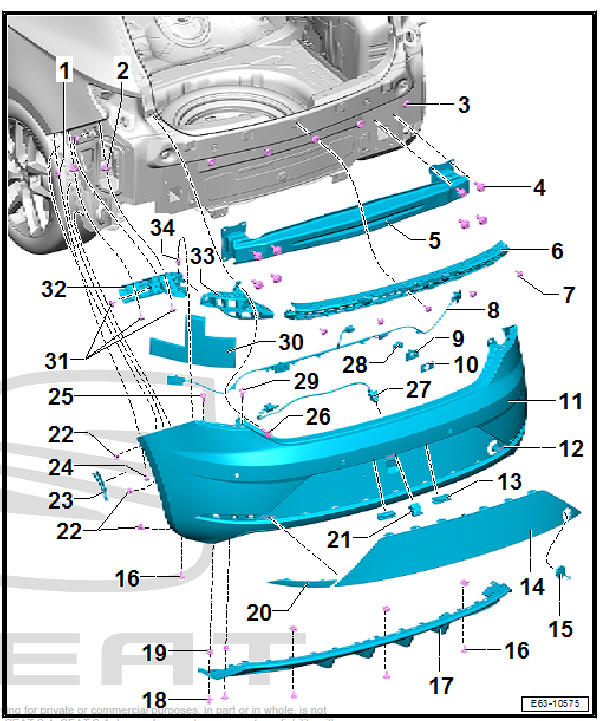
Model ST rear bumper trim: exploded view
- - Tight spreader block
- 6 + 6 each
| DANGER! Risk of ingress of exhaust fumes in the passenger compartment
|
- - Guide profile
- Left-side
Removing
- Remove the bumper trim.
- Remove screws -27-.
- Remove the guide profile.
- Proceed in exactly the same manner to remove the guide profile on the other side.
fitting
Installation is done in reverse order of removal operations.
- - Support plate
- - Spreader block
- - Rear view camera
- - Moulding
- - Sensor for rear steering parking aid
- - Sensor seal for the rear steering parking aid
- 4 off
- - Soundproofing sump
- 1 + 1 each
- - Sensor holder for the rear steering parking aid
- 4 off
- - Bolt.
- 1 + 1 each
- 2.5 Nm
- - Trailer hitch cover
- - Bolt.
- 3 + 3 each
- 2 Nm
- - Lower spoiler (rear bumper):
- - Reflector
- 1 + 1
- Remove using the lever - 3409-
- - Quick locking nut
- - Bolt.
- 1 + 1 each
- 2.5 Nm
- - Quick locking nut
- - Rivet
- - Heat shield
- - Rear bumper cover reinforcement
- - Bumper trim
- Material: PP/EPDM
- - Holder for rear view camera
- - Bolt.
- 1 + 1 each
- 2.5 Nm
- - Bolt.
- 1 + 1 each
- 1.7 Nm
- - Bolt.
- 2 + 2 each
- 2 Nm
- - Bolt.
- 6 + 6 each
- 2.5 Nm
- - Spreader block
- 1 + 1 each
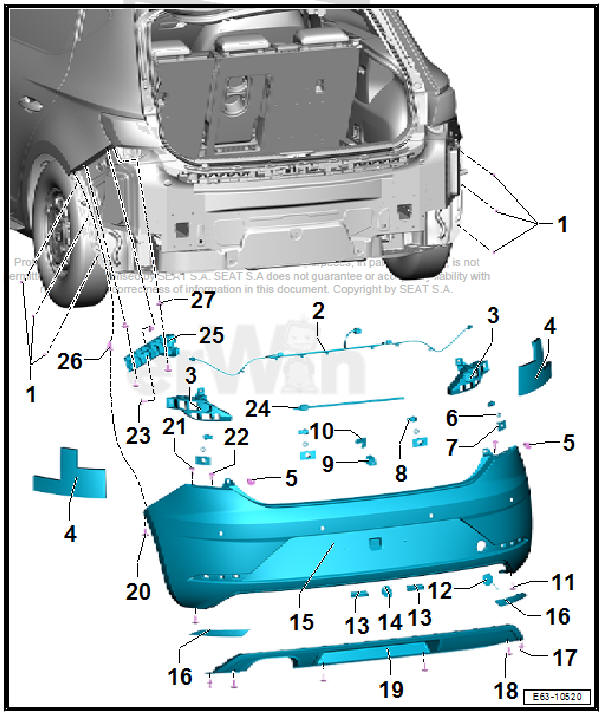
Rear bumper trim, X-PERIENCE model: Exploded view
- - Tight spreader block
- 6 + 6 each
| DANGER! Risk of ingress of exhaust fumes in the passenger compartment
|
- - Spreader block
- - Guide profile
- Left-side
Removing
- Remove the bumper trim
- Remove screws -31-.
- Remove the guide profile.
- Proceed in exactly the same manner to remove the guide profile on the other side.
fitting
Installation is done in reverse order of removal operations.
- - Support plate
- - Rear view camera
- - Sensor for rear steering parking aid
- - Sensor seal for the rear steering parking aid
- 4 off
- - Sensor holder for the rear steering parking aid
- 4 off
- - Soundproofing sump
- 1 + 1 each
- - Moulding
- - Top bumper trim
- Material: PP/EPDM
- - Holder for rear view camera
- - Rear bumper cover reinforcement
- - Lower bumper trim
- Material: PP/EPDM
- - Trailer hitch cover
- - Bolt.
- 3 + 3 each
- 2 Nm
- - Quick locking nut
- - Bolt.
- 1 + 1 each
- 2.5 Nm
- - Reflector
- 1 + 1
- Remove using the lever - 3409-
- - Lower spoiler (rear bumper)
- - Rivet
- - Heat shield
- - Bolt.
- 3 + 3 each
- 2 Nm
- - Bolt.
- 1 + 1 each
- 1.7 Nm
- - Spreader block
- 1 + 1 each
- - Bolt.
- 1 + 1 each
- 2.5 Nm
- - Bolt.
- 1 + 1 each
- 2.5 Nm
- - Bolt.
- 1 + 1 each
- 2.5 Nm
- - Heat shield
- - Rivet
- - Bolt.
- 6 + 6 each
- 2.5 Nm
Rear bumper trim, ST CUPRA model - exploded view
- - Tight spreader block
- 6 + 6 each
| DANGER! Risk of ingress of exhaust fumes in the passenger compartment
|
- - Spreader block
- - Guide profile
- Left-side
Removing
- Remove the bumper trim.
- Remove screws -30-.
- Remove the guide profile.
- Proceed in exactly the same manner to remove the guide profile on the other side.
fitting
Installation is done in reverse order of removal operations.
- - Soundproofing sump
- 1 + 1 each
- - Moulding
- - Rear bumper cover reinforcement
- - Wing extension
- - Sensor seal for the rear steering parking aid
- 4 off
- - Sensor for rear steering parking aid
- - Rear view camera
- - Sensor holder for the rear steering parking aid
- 4 off
- - Bumper trim
- Material: PP/EPDM
- - Holder for rear view camera
- - Bolt.
- 3 + 3 each
- 2 Nm
- - Trailer hitch cover
- - Lower spoiler (rear bumper):
- Removing and fitting
- - Bolt.
- 1 + 1 each
- 2.5 Nm
- - Reflector
- Left and right.
- Remove using the lever - 3409-
- - Bolt.
- 1 + 1 each
- 2.5 Nm
- - Quick locking nut
- - Bumper cover
- - Rivet
- - Heat shield
- - Quick locking nut
- - Bolt.
- 2 + 2 each
- 2 Nm
- - Bolt.
- 1 + 1 each
- 2.5 Nm
- - Bolt.
- 1 + 1 each
- 1.7 Nm
- - Spreader block
- 1 + 1 each
- - Support plate
- - Bolt.
- 6 + 6 each
- 2.5 Nm
- - Bolt.
- 1 + 1 each
- 2.5 Nm
Rear bumper trim, ST FR model - exploded view
- - Tight spreader block
- 6 + 6 each
| DANGER! Risk of ingress of exhaust fumes in the passenger compartment
|
- - Spreader block
- - Guide profile
- Left-side
Removing
- Remove the bumper trim.
- Remove screws -28-.
- Remove the guide profile.
- Proceed in exactly the same manner to remove the guide profile on the other side.
fitting
Installation is done in reverse order of removal operations.
- - Soundproofing sump
- 1 + 1 each
- - Moulding
- - Rear bumper cover reinforcement
- - Sensor seal for the rear steering parking aid
- 4 off
- - Sensor holder for the rear steering parking aid
- 4 off
- - Sensor for rear steering parking aid
- - Rear view camera
- - Bolt.
- 1 + 1 each
- 2.5 Nm
- - Quick locking nut
- - Bumper trim
- Material: PP/EPDM
- - Holder for rear view camera
- - Bolt.
- 3 + 3 each
- 2 Nm
- - Trailer hitch cover
- - Bumper cover
- - Bolt.
- 1 + 1 each
- 2.5 Nm
- - Reflector
- 1 + 1
- Remove using the lever - 3409-
- - Rivet
- - Heat shield
- - Quick locking nut
- - Bolt.
- 2 + 2 each
- 2 Nm
- - Bolt.
- 1 + 1 each
- 2.5 Nm
- - Bolt.
- 1 + 1 each
- 1.7 Nm
- - Spreader block
- 1 + 1 each
- - Support plate
- - Bolt.
- 6 + 6 each
- 2.5 Nm
- - Bolt.
- 1 + 1 each
- 2.5 Nm
 Rear bumper
...
 Exploded view - impact bar
Cross brace of the rear bumper cover, 3 and 5 door: assembly overview
- Cavity wax - AKR.308.SP5-
Note
To prevent water penetration
- Tight spreader block
5 off
DANGER ...
See also:
Changing the battery
If the battery indicator does not flash when the buttons are pushed, the
battery must be replaced.
Caution
Use of inappropriate batteries may damage the radio frequency remote
control. For this re ...
