Seat Leon >> Exploded view - vacuum pump
Exploded view - vacuum pump, vehicles with 1.8-l TSI and 2.0-l TSI engines
Note The vacuum pump is driven mechanically.
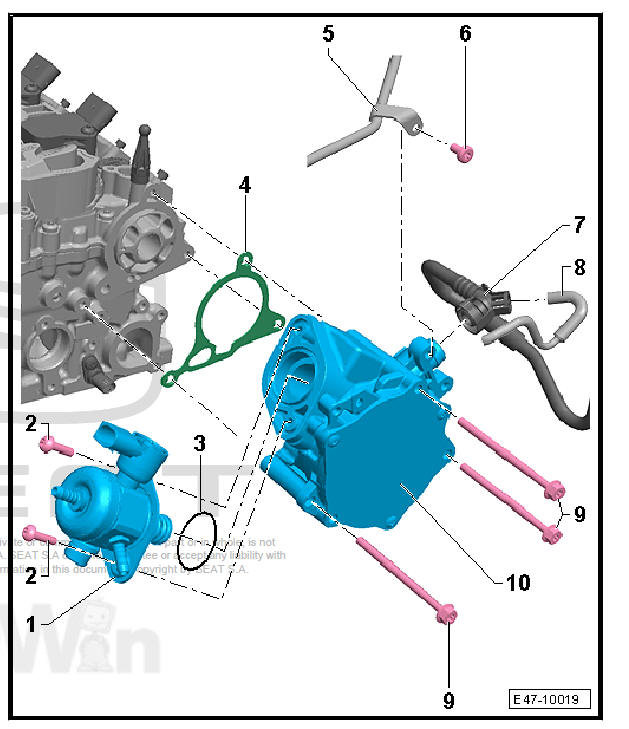
- - High-pressure pump
- Removing and installing
- - Bolt
- Tightening torque
- - O-ring
- - Seal
- Renew
- - Coolant pipe
- - Bolt
- 9 Nm
- - Vacuum line
- Replace if damaged
- - Vacuum line
- Replace if damaged
- - Bolt
- Specified torque: 9 Nm.
- - Manual vacuum pump
Removing and installing vacuum pump, vehicles with 1.8-l TSI and 2.0-l TSI engines
Removing:
- Remove the high-pressure pump.
- Screw the bolt -1- of the coolant line out.
- Disconnect the vacuum hoses -2 and 3- from the vacuum pump and lay to one side.
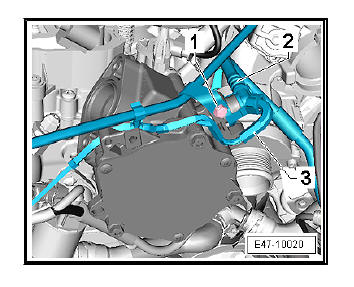
- Loosen and remove the screws of -arrows- vacuum pressure pump -2-.
- Lift the coolant line -1- up and remove the vacuum pump out of its seat.
Installation:
Carry out installation in the reverse sequence, noting the following:
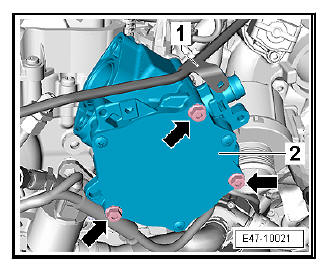
Note Renew seal.
- Ensure that seal is seated correctly.
- Turn the drive lug of vacuum pump -1- so it engages in the slot in the camshaft when the vacuum pump is installed -arrows-.
- Install the high-pressure pump .

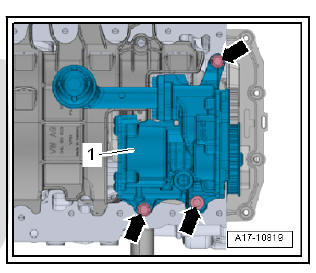
Removing and installing vacuum pump (vehicles with TDI engine)
Note The vacuum pump of the brake booster is installed in oil pump -1-.
- Removing and installing oil pump with vacuum pump.
Checking the retention valve
Test sequence
- Carefully pull non-return valve with vacuum line -1- out of brake booster.
- Blow small amount of air through non-return valve -1- in one direction first, then in other direction.
- Air must pass through non-return valve -1- in -direction of arrow-.
- The non-return valve -1- must remain closed in the opposite -direction of arrow-. If this is not the case, renew non-return valve or, if necessary, complete vacuum line.
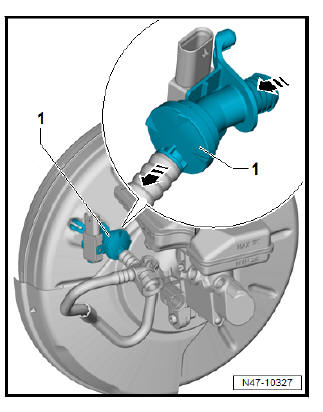
Note When installing the vacuum line with non-return valve, ensure the correct installation position relative to the brake booster.
Removing and installing non-return valve
Note
- The non-return valve is fitted directly in front of the vacuum pump.
- The vacuum pump does not have to be removed.
Removing:
- Open the O-type clip on the vacuum hose with a suitable pair of pliers.
- Detach vacuum hose from vacuum pump for brakes - V192- .
| Caution Take care not to damage the vacuum hose. A damaged vacuum hose is to be renewed. |
- Pull the non-return valve out of the vacuum hose.
Installation:
- Place the non-return valve into the vacuum hose.
Note
- Pay attention to correct installation position.
- The arrow indicating the flow direction points towards the vacuum pump.
- To simplify fitting, lightly moisten the non-return valve and the vacuum hose with water but not with oil.
- Push a new O-type clip over the vacuum hose.
 Exploded view - electric vacuum pump
Exploded view - electric vacuum pump, vehicles with 1.2-l TSI and 1.4-l
TSI
engines
- Brake vacuum pump -
V192-
- Vacuum line
- Support
- Bolt
8 Nm
- Rubber damper
3 off ...
 Checking vacuum system
Notes on checking vacuum system
The following instructions are intended to help you trace the causes
of faults quickly and effectively in the event of problems
involving the brake servo or in the e ...
See also:
Dimensions - lettering and emblems on
rear lid
Dimensions: Emblem "Leon" in the tailgate (2 and 4-door models)
Special tools and workshop
equipment required
Hot-air blower - SAT 1416-
Digital thermometer - SAT
4013-
Thrust piece - T200 ...
