Seat Leon >> Removing and installing the wheels
Note Further information concerning rims and tyres can be obtained in the - Instructions for rims and tyres.
Note The distance between the faces for the application of the wrench to the adapter for the wheel bolts may differ from the distance between faces of the master set.
Special tools and workshop equipment required
- Adapter set for tamper-proof wheel bolts - T20213-
- Torque wrenches - V.A.G 1332-
Removing the wheel
Note
- Raise the vehicle using only the specially designed sockets.
- To loosened the wheel bolts, use a tube spanner of the correct size. Do not use tube spanners that have been damaged or twisted.
- Keep the wheel bolts clean.
Removing the wheel trim
| Caution Do not remove the wheel hub covers for alloy wheels using a screwdriver. Use the specially designed tool (extraction hook included with the vehicle tools). |
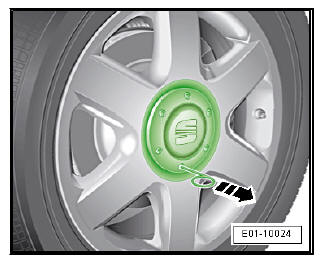
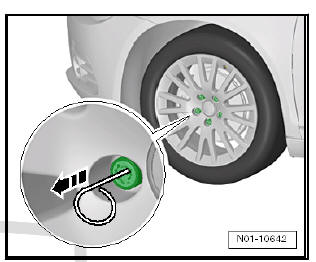
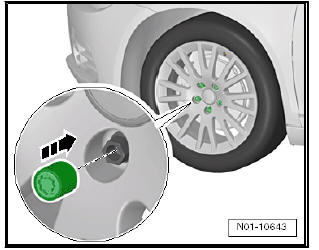
The extractor hook -1- to extract the caps is a part of the tools of the vehicle.
- Position the extractor hook at one of the openings in the wheel hub cover and pull in the direction of the -arrow-.
Remove the wheel hubcap:
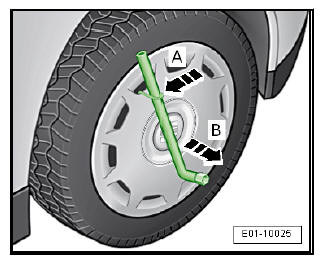
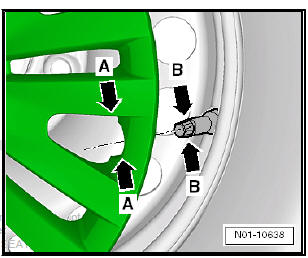
- On vehicles with wheel trim, loosen wheel trim all around as shown, e.g. using puller hook and wheel brace from vehicle tool kit -arrow A- and then pull off -arrow B-.
Remove the wheel bolt covers
| Caution Do not remove the wheel bolt covers for alloy wheels using a screwdriver. Use the specially designed tool (extraction hook included with the vehicle tools). |
Note The wheel bolt covers have to be removed before loosening or tightening the wheel bolts.
The extractor hook to extract the bolt caps is a part of the tools of the vehicle.
- Position the extractor hook at one of the cap openings.
- Remove the wheel hub cover using the extractor.
Loosen the anti-theft wheel bolts
Note
- To loosen or tighten the anti-theft wheel bolts, you need a special adapter that is part of the on-board tools.
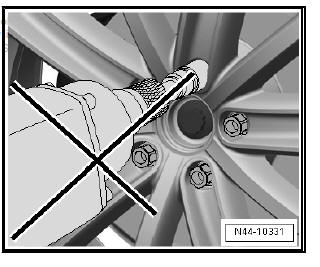
- You are not allowed to not use an impact screwdriver to loosen the anti-theft wheel bolts (bolts with lock).
- If there is no adapter in the vehicle for tightening / loosening the anti-theft wheel bolts, use the respective main kit for the wheel bolts.
- Loosen the remaining wheel bolts and remove the wheel.
| DANGER! The correct seating of the wheels and wheel bolts is only guaranteed if the checks and instructions below are followed. |
The following checks and instructions should be carried out while the wheel rim is dismounted.
- Check that contact surfaces on brake disc/wheel hub or brake disc/brake drum and wheel (rim) are free of corrosion and dirt.
- Remove any oil, grease or rust.
- Check whether centring hole of wheel (rim) and centring element of wheel hub are free from corrosion and dirt.
- If necessary, remove any oil, grease or rust and re-establish corrosion protection using a wax spray - Electronic parts catalogue in the centre zone.
Note
- Wax spray must not enter into contact with elements of the brake system.
- Any rust or dirt which drops between brake disc and wheel hub on removal should be blown out with compressed air.
| DANGER! Use eye protection glasses when working with compressed air. |
The rim support cones and the wheel bolts must be free from rust and dirt.
- Soiled wheel rim support cones must be cleaned with a lint free cloth.
- Ensure that the wheel bolts and the hub bolt holes are free from rust and dirt.
- Clean soiled wheel bolts in the area of the cones and the threads using a metal brush.
Note Replace heavily corroded or rusty wheel nuts.
| WARNING Never wax the wheel bolts, or the support surfaces and threads of the wheel. Do not apply lubricants or anti-corrosive products to the threads of the wheel bolts. |
Fitting the wheel.
- Check whether the wheel bolts can be easily tightened by hand. When fitting the wheel, the thread of the nuts should turn easily along the whole length of the nut.
- Ensure that the hub thread coincides. The thread of the wheel nuts should not come into contact with the brake disc opening.
If the thread of the wheel bolt touches the opening, turn the brake disc as necessary.
- Fit the wheel to the hub and secure by hand-tightening two bolts in opposite positions.
- Screw in the remainder of the bolts by hand; the bolts should be easily screwed into place.
- Hand tighten the wheel nuts evenly.
Tighten the anti-theft wheel bolts.
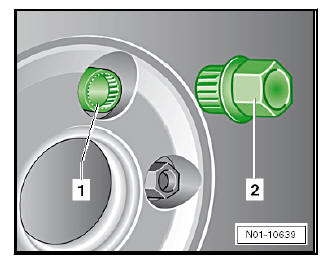
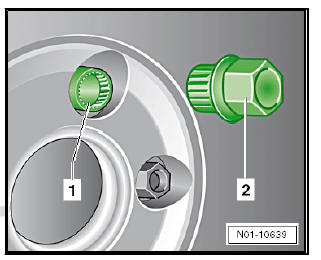
- Insert the adapter -2- all the way over the anti-theft wheel bolt -1-.
- Insert the wheel spanner all the way over the adapter -2-.
Ensure that the wheel is perfectly centred.
- Pre-tighten the wheel bolts alternating diagonally to approx,. 50 Nm.
| WARNING Never use an impact screwdriver for tightening the wheel bolts. |
- Lower the vehicle and tighten the nuts in diagonal pairs to the specified torques.
Fit the wheel hub cover, wheel bolt covers and the wheel trim
- Press the wheel hub cover in the intended opening of the wheel hub. Ensure that -A and B- are accurately fitted on rim.
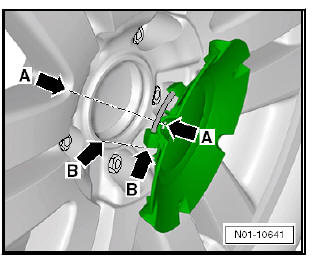
Install the wheel bolt covers.
Press the wheel trim equally onto the steel rim. Make sure that valve -B- seats in cut-out -A- of wheel trim.
Note Place extractor and adapter back in vehicle tool kit after completing work.
 Pressing tyre off wheel rim
New wheels with a modified contour have been introduced for all
vehicles as of model year 2005.
The tyre fitting unit must be furnished with the tyre fitting head
designed for these wheels.
...
 Tyre pressure monitoring system
System description - tyre pressure monitoring
system
General notes:
The tyre pressure monitor display is part of the software in the
ABS control unit - J104- . It detects the gradual reduction of ...
See also:
Running-in
Running-in a new engine
The engine needs to be run-in over the first 1,500 km.
Up to 1,000 kilometres
– Do not drive faster than three quarters of top speed.
– Do not accelerate hard.
– Avo ...
