Seat Leon >> Removing and installing wheel bearing housing
Removing and installing wheel bearing housing, multi-link suspension, frontwheel drive
Special tools and workshop equipment required
- Torque wrenches - V.A.G 1332-

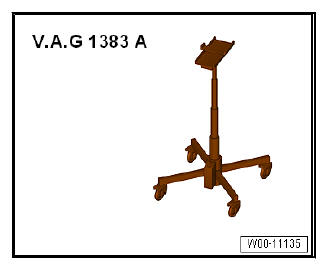
- Engine and gearbox jack - V.A.G 1383 A- or -VAS 6931-
Removing
- Remove rear wheel on affected side.
- Remove wheel bearing unit .
- Remove heat shield .
- Remove the coil springs.
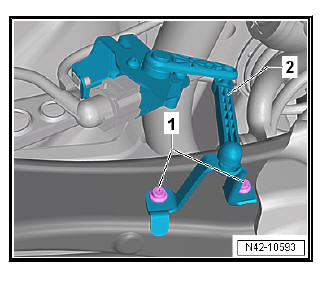
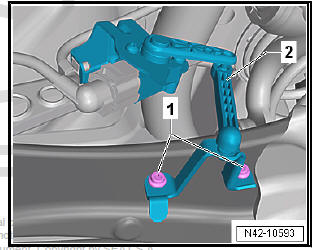
Vehicles with vehicle level senders
- Remove bolts -1-.
- Remove retainer for rear left vehicle level sender -2-.
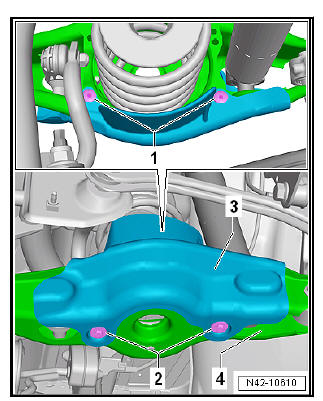
Vehicles with stone deflector
- Remove spreader rivets -1-.
- Remove bolts -2- for stone guard -3-.
Continuation for all models:
- Pull connector off ABS speed sensor.
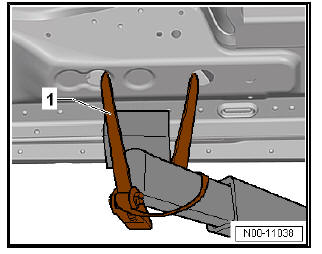
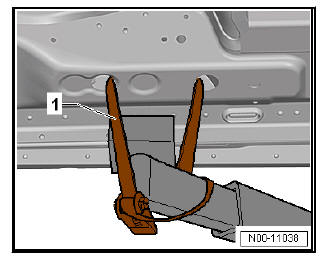
- Use tensioning straps - T10038- to strap vehicle to support beams of lifting platform on both sides.
| WARNING If the vehicle is not strapped down, there is a great danger that the vehicle will slip off the lifting platform! |
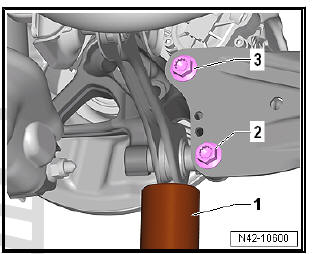
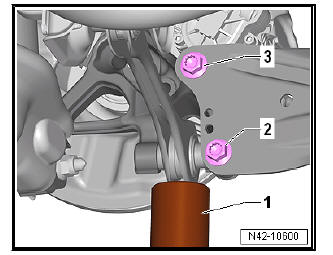
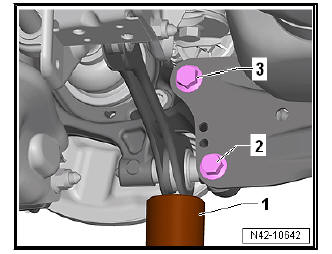
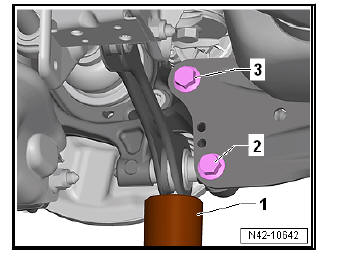
- Position engine and gearbox jack - V.A.G 1383 A- -1- under track rod and press upwards slightly.
- Unscrew bolts -2- and -3- one after the other.
- Remove engine and gearbox jack - V.A.G 1383 A- -1- from under track rod.
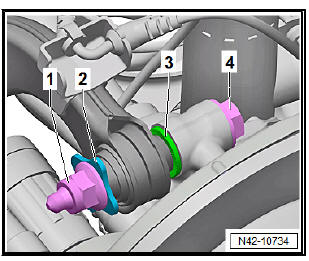
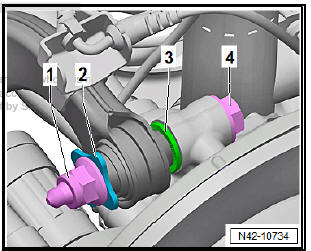
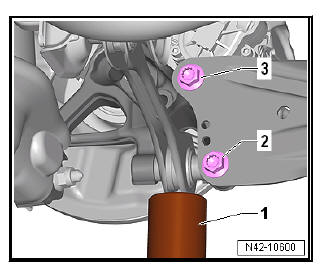
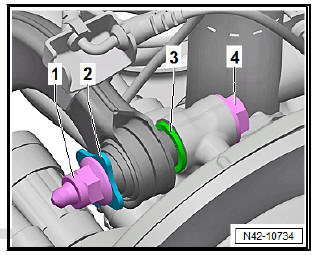
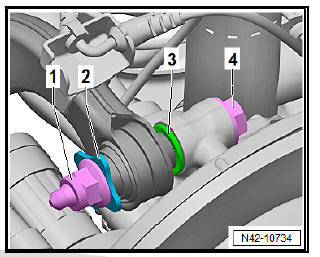
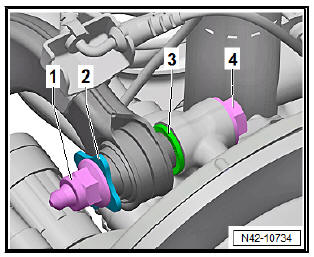
- Unscrew nut -1- and remove washer -2-.
- Unscrew bolt -4-.
- Remove shim -3-.

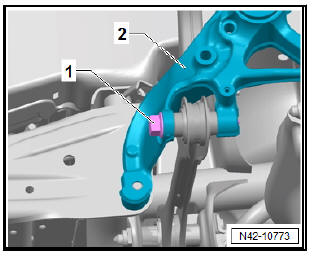
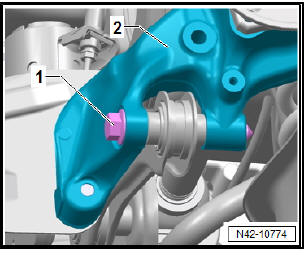
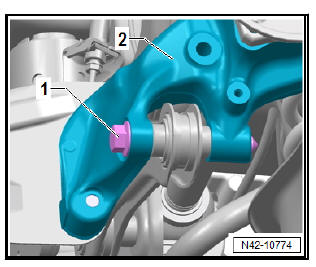
- Unscrew bolt -1-.
- Take out wheel bearing housing -6-.
Installing
Carry out installation in the reverse sequence, noting the following:
It is essential to follow specified sequence of prescribed work steps below!
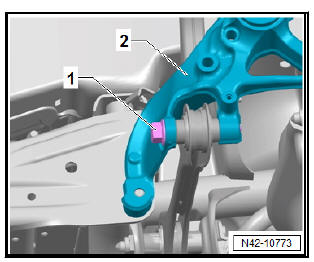
- Insert wheel bearing housing -2-.
- Insert bolt -1- and tighten only hand-tight.
- Insert bolt -4- with washer -3-.
- Insert washer -2-.
- Screw in bolt -1-, and tighten it by hand.
- Position engine and gearbox jack - V.A.G 1383 A- -1- under track rod and press upwards slightly.
- Screw in bolts -2- and -3- by hand.
- Remove engine and gearbox jack - V.A.G 1383 A- -1- under the track rod.
- Install heat shield .
- Install wheel bearing unit.
The threaded connections of the wheel bearing housing may only be loosened and tightened in the unladen weight position.
- Tighten the bolt -1-.
- Tighten nut -1-.
- Detach engine and gearbox jack - V.A.G 1383 A- with support - T10149- from wheel hub.
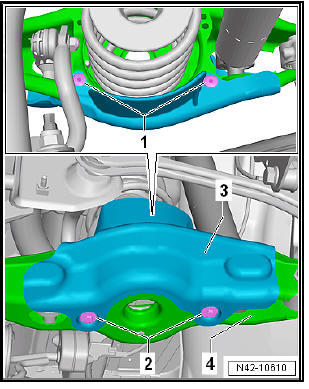
Do not tighten bolts securing trailing arm to wheel bearing housing until all other suspension components (especially spring and shock absorber) on that side are fitted. The wheel suspension must be in extended position before securing. The trailing arm and the wheel bearing housing will only then move into the required position -arrows-.
- Installing spring.
- Tighten the bolts -2- and -3-.
Specified torques
- Bolts for heat shield, brake caliper and brake disc.
- On vehicles with vehicle level sender, carry out basic settings for wheel damper electronics - Vehicle diagnostic tester.
- On vehicles with vehicle level sender, carry out basic adjustment of headlights.
Removing and installing wheel bearing housing, multi-link suspension, four-wheel drive
Special tools and workshop equipment required
- Torque wrenches - V.A.G 1332-

- Engine and gearbox jack - V.A.G 1383 A- or -VAS 6931-
Removing
- Loosen bolt securing drive shaft at wheel hub.
| Caution Wheel bearings must not be subjected to load after loosening bolt securing drive shaft at wheel hub. If they have to support the weight of the vehicle they will be damages and their service life will be reduced. It is not permissible to turn drive shaft bolt more than 90º anticlockwise if vehicle is standing on its wheels. Do not attempt to move the vehicle without the drive shafts fitted; this would result in wheel bearing damage. If it is necessary for a vehicle to be moved, please comply with the following instructions:
|
- Remove rear wheel on affected side.
- Remove wheel bearing unit.
- Remove heat shield .
- Remove the coil springs.
Vehicles with vehicle level senders
- Remove bolts -1-.
- Remove retainer for rear left vehicle level sender -2-.
Vehicles with stone deflector
- Remove spreader rivets -1-.
- Remove bolts -2- for stone guard -3-.
Continuation for all models:
- Pull connector off ABS speed sensor.
- Use tensioning straps - T10038- to strap vehicle to support beams of lifting platform on both sides.
| WARNING If the vehicle is not strapped down, there is a great danger that the vehicle will slip off the lifting platform! |
- Position engine and gearbox jack - V.A.G 1383 A- -1- under track rod and press upwards slightly.
- Unscrew bolts -2- and -3- one after the other.
- Remove engine and gearbox jack - V.A.G 1383 A- -1- under the track rod.
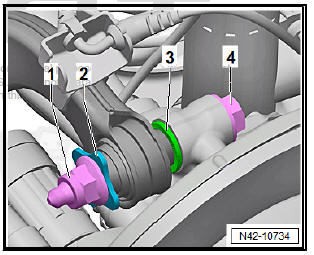
- Unscrew nut -1- and remove washer -2-.
- Unscrew bolt -4-.
- Remove shim -3-.
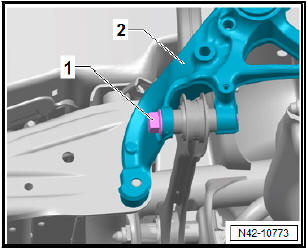
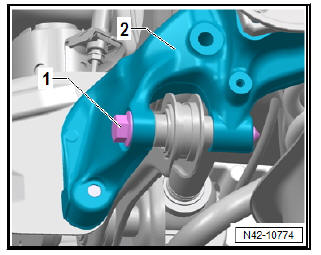
- Unscrew bolt -1-.
- Take out wheel bearing housing -2-.
Installing
Carry out installation in the reverse sequence, noting the following:
It is essential to follow specified sequence of prescribed work steps below!
- Insert wheel bearing housing -2-.
- Insert bolt -1- and tighten only hand-tight.
- Insert bolt -4- with washer -3-.
- Insert washer -2-.
- Screw in bolt -1-, and tighten it by hand.
- Position engine and gearbox jack - V.A.G 1383 A- -1- under track rod and press upwards slightly.
- Screw in bolts -2- and -3- by hand.
- Remove engine and gearbox jack - V.A.G 1383 A- -1- under the track rod.
- Install wheel bearing unit.
- Install heat shield.

Bolt wheel bearing housing to body only in unladen position
- Tighten nut -1-.
- Tighten the bolt -1-.
- Tighten nut -1-.
- Detach engine and gearbox jack - V.A.G 1383 A- with support - T10149- from wheel hub.
Do not tighten bolts securing trailing arm to wheel bearing housing until all other suspension components (especially spring and shock absorber) on that side are fitted. The wheel suspension must be in extended position before securing. The trailing arm and the wheel bearing housing will only then move into the required position -arrows-.
- Install coil spring.

- Tighten the bolts -2- and -3-.
Specified torques
- Bolts for heat shield, brake caliper and brake disc.
- On vehicles with vehicle level sender, carry out basic settings for wheel damper electronics - Vehicle diagnostic tester.
- On vehicles with vehicle level sender, carry out basic adjustment of headlights.
 Assembly overview - wheel bearing
Assembly overview - wheel bearing assembly, torsion beam axle
- Grease cap
Always renew after removing
Removing and installing
A proper seal can be
achieved only by installing
a n ...
 Removing and installing wheel bearing
unit
Removing and installing wheel bearing
unit
Removing and installing wheel bearing unit, torsion beam axle
Special tools and workshop
equipment required
Fitting sleeve - 3241/4-
Wheel hub cover extractor -
VW 637/2-
Torque wrenches - ...
See also:
Heating and cooling the interior
Fig. 108 On the dash panel: Climatic controls
Heating of the vehicle interior
– Turn the temperature selector fig. 108 1 clockwise to select
the required temperature.
– Turn the blower ...
