Seat Leon >> System overview - refrigerant circuit
SEAT Leon Service and Repair Manual / Heating and air conditioning / Air conditioning system / Refrigerant circuit / System overview - refrigerant circuit
- Observe instructions when working on refrigerant circuit
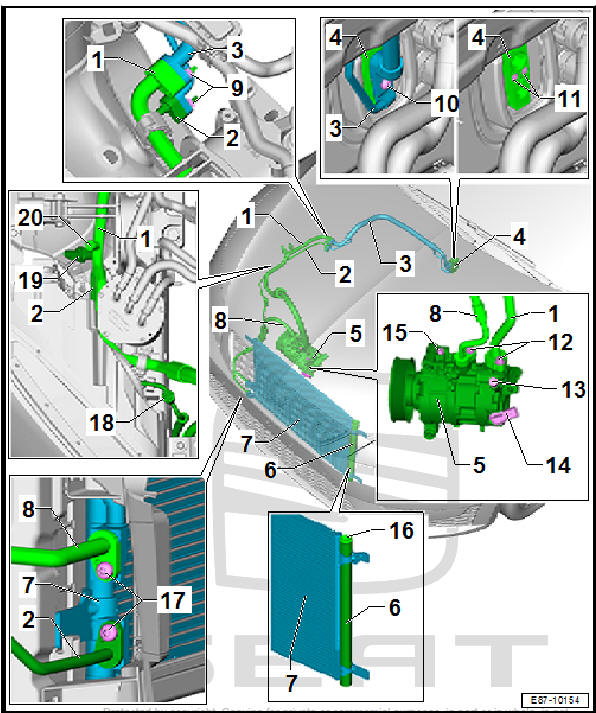
- - Refrigerant line, low-pressure
side
- Removing and installing damper weight
- - Refrigerant line, high-pressure side
- - Refrigerant line with internal
heat exchanger
- Removing and fitting
- - Expansion valve
- Removing and fitting
- - Air conditioning compressor
- General exploded view
- Removing and fitting
- Removing and installing air conditioning compressor from and to bracket
- - Receiver with dryer bag
- Removing and fitting
- - Condenser
- General exploded view
- Removing and fitting
- - Refrigerant piping
- - Nuts
- 8 Nm
- - Bolt.
- 8 Nm
- - Bolt.
- 10 Nm
- - Bolt.
- 22 Nm
- - High-pressure safety valve on air conditioner compressor
- Checking
- - Connector with air conditioner compressor regulating valve - N280- .
- - Oil drain plug
- - Protective cap
- Manufacturer Modine: 5 Nm
- - Bolt.
- 8 Nm
- - Service connection on high-pressure end
- Removing and fitting
- Protective cap: 0.4 +- 0.1 Nm
- Valve: 2 +- 0.2 Nm
- - Pressure sender for refrigerant circuit - G805-
- Removing and fitting
- 5 +- 1 Nm
- - Service connection on low-pressure end
- Removing and fitting
- Protective cap: 0.4 +- 0.1 Nm
- Valve: 2 +- 0.2 Nm

 Assembly overview - condenser
Condenser, receiver
- Condenser
Removing and fitting
- O ring
Replace
Moisten with refrigeration
oil before fitting
- Refrigerant piping
- Bolt.
8 Nm
- B ...
See also:
Description of side airbags
The airbag system is not a substitute for the seat belts.
Fig. 21 Side airbag in
driver seat
The side airbags are located in the backrest cushions of the driver seat
fig. 21 and the front ...
