Seat Leon >> Installing and removing servomotor for headlight range adjustment V48 / V49
Installing and removing servomotor for headlight range adjustment V48 / V49, halogen headlight
Special tools and workshop equipment required
- Lever - U 30800-

Note
- In the figures, the replacement of the left headlight range control motor - V48- of the left headlight is displayed. The renewal of the motor for the headlight range control - V49- of the right-hand headlight is carried out in the same way.
- The headlight does not have to be removed.
Removing
- Switch off ignition and all electrical consumers.
Vehicles without access and start authorisation system
- Remove ignition key, if fitted.
Vehicles with access and start authorisation system
- Store the ignition key outside the vehicle to prevent the ignition from being switched on unintentionally.
Continued for all vehicles
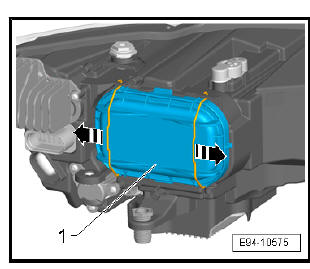
- Turn the swivel of the transfer system of the control to the end position.
- Remove the headlight cover -2- and -3-.
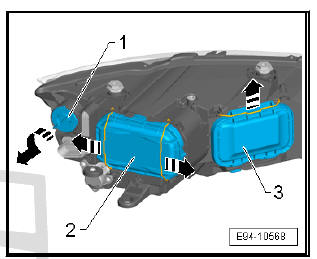
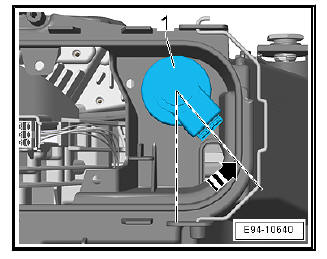
- Disconnect plug -1-.
- Turn the left headlight range control motor - V48- -2- to the right -arrow-.
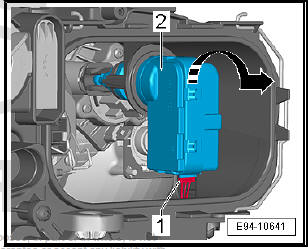
- Remove the swivel -1- using the lever - U30800- in -the arrow direction- .
- To tighten the left headlight range control motor - V48- pivot the ball head -2- in the guide -3- and pull the ball head from the guide end -arrow-.

Installing
Installation is carried out in the reverse sequence; note the following:
- Turn the ball head of the servomotor to the left for light range adjustment - V48- by hand until it has been completely removed -B-.
- Pull the optical unit by hand through the headlight cover, so that the dipped beam reflectors face up.
- Hold the dipped beam reflectors up and insert the ball head of the left servomotor for light range adjustment - V48- into the guide.
Note
It is absolutely essential to adjust the headlights after every removal of the left-side actuator motor for beam throw adjustment - V48- .
Installing and removing servomotor for headlight range adjustment V48 / V49, LED headlights
Special tools and workshop equipment required
- Lever - U 30800-
Note
- In the figures, the replacement of the left headlight range control motor - V48- of the left headlight is displayed. The renewal of the motor for the headlight range control - V49- of the right-hand headlight is carried out in the same way.
- The headlight does not have to be removed.
Removing
- Switch off ignition and all electrical consumers.
Vehicles without access and start authorisation system
- Remove ignition key, if fitted.
Vehicles with access and start authorisation system
- Store the ignition key outside the vehicle to prevent the ignition from being switched on unintentionally.
Continued for all vehicles
- Remove the lock carrier strut .
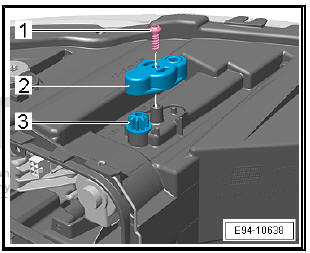
- Remove the cover -1- by releasing the springs -arrows-.
- Turn the swivel of the transfer system of the control -2- into the end position.
- Unscrew the bolt -1-.
- Completely remove the transfer system of the control -2- .
- Remove the swivel -3- using the lever - U30800- .
- Disconnect the plug of the Servomotor on the left for light range adjustment - V48-.
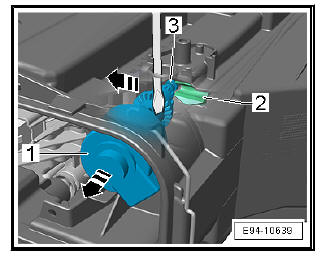
- Release the left headlight range control motor - V48- -1- by turning in the -direction of the arrow-.
- Swivel the left servomotor for light range adjustment - V48- and remove the ball head -3- from the holder -2- from the side.
- If necessary, use a screwdriver as a lever and pry ball head out of guide.
Installing
Installation is carried out in the reverse sequence; note the following:
- Turn the ball head of the servomotor to the left for light range adjustment - V48- by hand until it has been completely removed -B-.
- Pull the optical unit by hand through the headlight cover, so that the dipped beam reflectors face up.
- Hold the dipped beam reflectors up and insert the ball head of the left servomotor for light range adjustment - V48- into the guide.
Note It is absolutely essential to adjust the headlights after every removal of the left-side actuator motor for beam throw adjustment - V48- .
 Installing repair kit for headlight housing
Note
Broken-off headlight retaining tabs can be renewed by installing
repair kit. Therefore there is no need to replace the entire
headlight.
Different repair kits are available for both lef ...
 Removing and installing dipped beam
bulb
Removing and installing dipped beam
bulb
Note
The illustrations show how to change the dipped beam bulb of
the left headlight. The dipped-beam bulb in the right-hand
headlamp is replaced in the same way.
The headlight does not have ...
See also:
Removing and installing door hinge
Special tools and workshop equipment required
Torque wrench - V.A.G 1331-
Release lever - 3409-
Note
The sequences below describe the processes for removal and
installation for the ...
