Seat Leon >> Rear window wiper system
Assembly overview - rear window wiper system
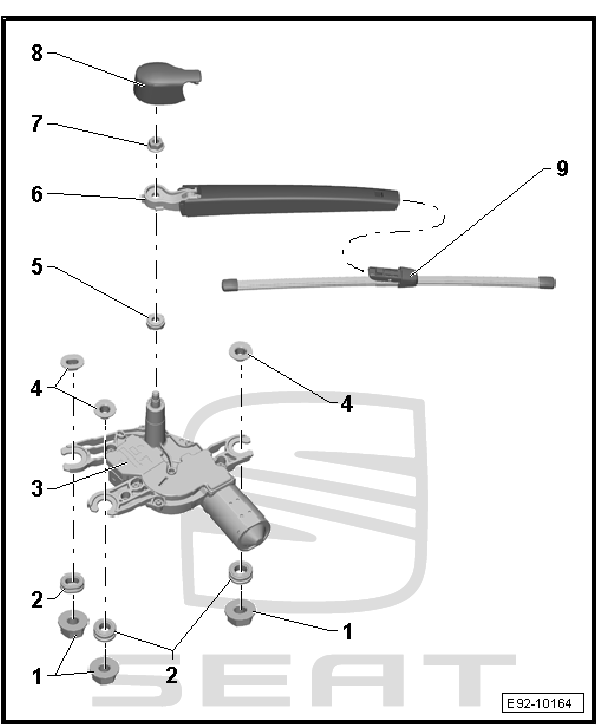
- - M6 securing nut with washer
- 3 units.
- 8 Nm
- - Washer
- 3 units.
- - Rear windscreen washer
motor - V12-
- Removal and installation
- - Separation element
- 3 units.
- - Rubber seal
- Renew if damaged.
- Removal and installation
- - Windscreen wiper arm
- Removal and installation
- Adjusting
- - Nut
- 12 Nm
- - Cap for rear window wiper
- - Wiper blades
- Replace
Removing and installing wiper blade
Removing
Note The joint-free wiper blade is very flexible. To lift the wiper blade off the rear window, grasp it only in the area in which the wiper blade is attached to the wiper.
- Fold up wiper arm -2-.
- Push the button -1- and pull on the wiper blade -3-, as far as it will go. Bend the wiper blade -3- and take it in the -direction of the arrow- out of its mounting.
Installing
Installation is carried out in reverse order.
Removing and installing windscreen wiper arm
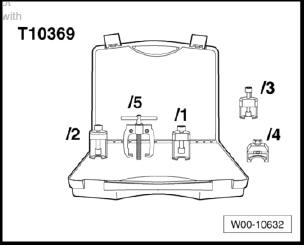
Special tools and workshop equipment required
- Tool kit for wiper arms - T10369-
Removing
- Switch on ignition.
- Actuate rear wiper and allow wiper arm to move to end position.
- Switch off ignition and all electrical consumers.
Vehicles without access and start authorisation system
- Remove ignition key, if fitted.
Vehicles with access and start authorisation system
- Store the ignition key outside the vehicle to prevent the ignition from being switched on unintentionally.
Continued for all vehicles
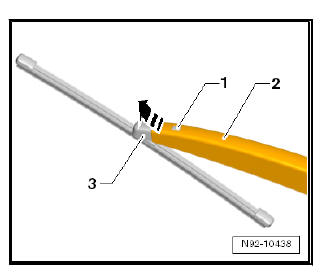
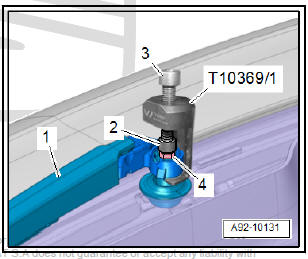
- Raise cowling -1- of rear window wiper and hook out.
- Loosen but do not completely remove securing nut -arrow-.

- Apply puller - T10369/1- at wiper arm -1- as shown in illustration.
- Apply thrust piece -2- at wiper shaft.
- Turn bolt -3- clockwise until wiper arm is clear of wiper shaft.
- Remove nut and detach wiper arm.
Installing
Installation is carried out in the reverse sequence; note the following:
- Adjust wiper arm.
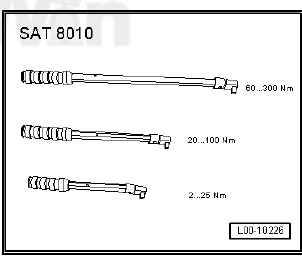
Adjusting windscreen wiper arm
Special tools and workshop equipment required
- Torque spanner set - SAT 8010-
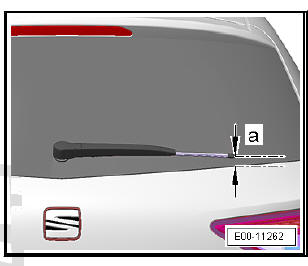
- Put the windscreen wiper arm, with the wiper blade fitted, on the windscreen wiper shaft. Align the wiper blade on the rear window, in the following manner:
Note
- The measurement -a- gives the distance from the point of the wiper blade to the lower edge of the window.
- Dimension -a- for the adjustment is marked on the rear window.
- Switch on ignition.
- Activate the rear window washer and ensure the wiper arm reaches the resting position.
- Re-check the windscreen wiper arm adjustment; correct it if necessary.
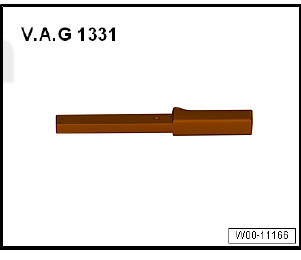
Installing and removing the V12 back window wiper motor
Special tools and workshop equipment required
- Torque wrenches - VAG 1331-
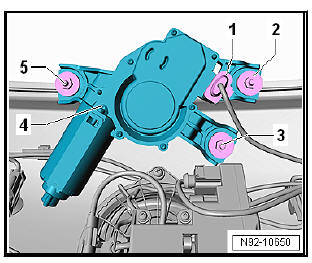
Removing
- Removing wiper arm.
- Removing lower interior tailgate panel .
- Pull out the plug -1-.
- Unscrew nuts -2-, -3- and -5-.
- Remove rear window wiper motor - V12- -4-.
Installing
Installation is carried out in the reverse sequence; note the following:
- Before installing rear window wiper motor, moisten inner side of rear window rubber seal using a rubber and plastic compatible lubricant (e.g. polyethylene glycol), if necessary.
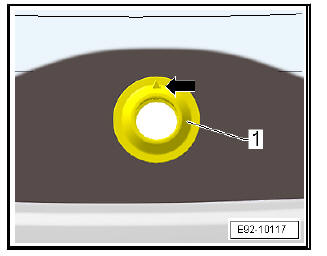
- Insert rubber seal -1- into rear window.
- The -arrow- on the sealing rubber points to the roof of the vehicle.
 Jet adjustment
WARNING
Never clean the nozzles using any objects.
To install the conducts, do not use a needle or similar
object
under any circumstances, as it could damage the jet
water ...
 Rear window washer system
Assembly overview - rear window washer
system
Assembly overview - back windscreen wiper system, vehicles without
additional
left cooler
- Windscreen and headlamp
washer reservoir
Remov ...
See also:
Adhesive strips for headlights
If you have to drive a right-hand drive vehicle in a left-hand drive country,
or
vice versa, the asymmetric dipped beam headlights will dazzle oncoming
traffic.
To prevent dazzling, you must ap ...
