Seat Leon >> Removing and installing headlamp washer reservoir
Installing and removing the filler pipes of the washer fluid reservoir, vehicles without additional left cooler
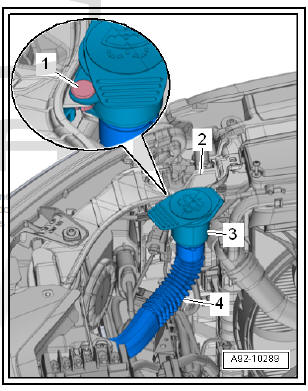
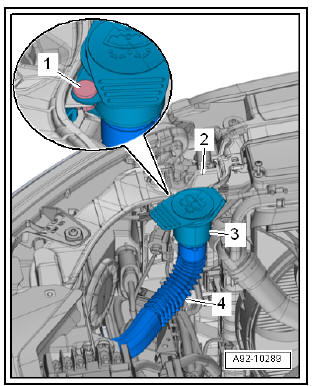
Removing
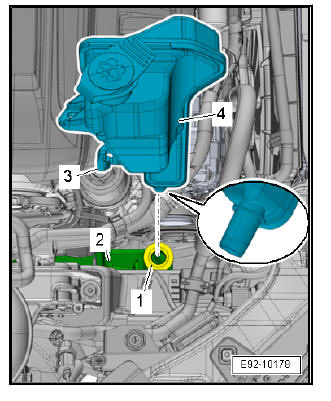
- Detach fastener -1-.
- Pull filler neck -3- out of bracket on lock carrier -2-.
- Pull filler neck off filler pipe -4-.
Installing
Installation is carried out in the reverse sequence; note the following:
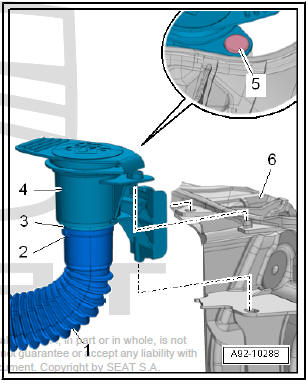
- Slide filler neck -4- onto filler pipe -1- as far as stop.
- Lug -3- must make contact in recess -2- on filler pipe.
- Fit filler neck onto lock carrier -6- and secure with fastener -5-.
Installing and removing the washer fluid reservoir, vehicles without additional left cooler
Special tools and workshop equipment required
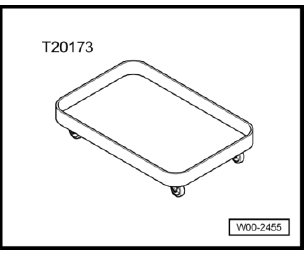
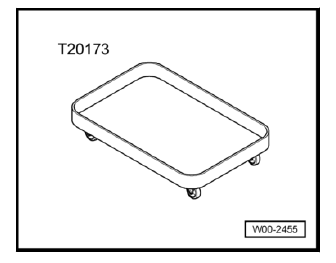
- Rear shelf - T20173-
Note This procedure describes the removal and installation of the fluid reservoir for the windscreen and headlamp washer system. Removal and installation of washer fluid reservoirs without headlight washer system are carried out in the same way.
Removing
- Place the vehicle on a lifting platform.
- Switch off ignition and all electrical consumers.
Vehicles without access and start authorisation system
- Remove ignition key, if fitted.
Vehicles with access and start authorisation system
- Store the ignition key outside the vehicle to prevent the ignition from being switched on unintentionally.
Continued for all vehicles
- Remove the left front wheel.
- Remove the spoiler on the front left wheel well.
- Place below the collecting tray - T20173- .
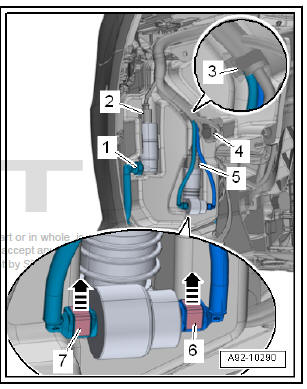
- Detach fastener -1-.
- Pull filler neck -3- out of bracket on lock carrier -2-.
- Pull filler pipe off -4- washer fluid reservoir.
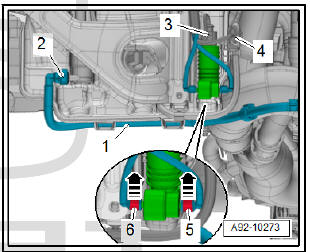
- Unplug electrical connectors -2, 4, 5- and detach wiring harness -3- from washer fluid reservoir.
- Unlock lid catches -6 and7- -Arrows- and remove the fluid lines from the windscreen washer pump.
- Press release tab and pull washer fluid hose -1- off headlight washer system pump.
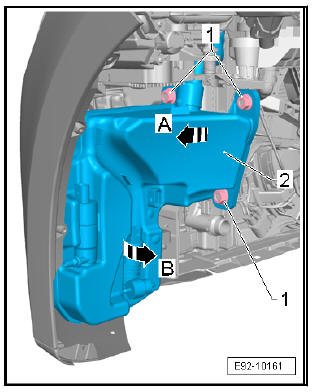
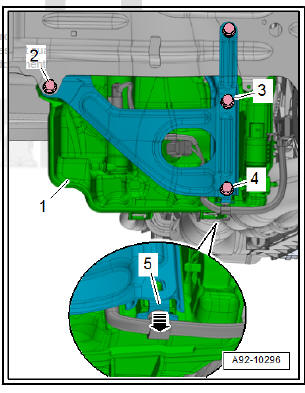
- Unscrew the fixing nuts -1- of the chamber on the bodywork.
- Undo the washing water tank -2- from the threaded pins at the front and bottom -arrow A-.
- Swivel washer fluid reservoir to rear -arrow B- and remove.
Installing
Installation takes place in reverse order.
Installing and removing the filler pipes of the washer fluid reservoir, vehicles with additional left cooler
Removing
- Place the vehicle on a lifting platform.
- Switch off ignition and all electrical consumers.
Vehicles without access and start authorisation system
- Remove ignition key, if fitted.
Vehicles with access and start authorisation system
- Store the ignition key outside the vehicle to prevent the ignition from being switched on unintentionally.
Continued for all vehicles If there is washer fluid in the filler hose, drain it off.
- Remove the right front wheel .
- Remove the spoiler on the front left wheel well .
- Put the drip pan - T20173- under the windscreen and front headlight washing unit.
- Unlock lid catches -5 and 6- -Arrows- and remove the fluid lines from the windscreen washer pump.
- Press release tab and pull washer fluid hose -2- off headlight washer system pump.
Continued for all versions
- Unscrew the bolt -1-.
- Remove filler neck -2- upwards and out of its retainer and the windscreen and headlamp washer reservoir -arrow-.
Installing
Installation is carried out in the reverse sequence; note the following:
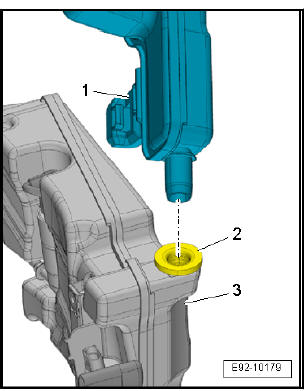
- Check that sealing grommet -1- is seated correctly.
- Place filler neck in retainer -2- and in windscreen and headlamp washer reservoir.
- Insert filler neck into washer fluid reservoir.
- When doing so, guide -3- must be aligned with the retainer.
Installing and removing the washer fluid reservoir, vehicles with additional left cooler
Special tools and workshop equipment required
- Rear shelf - T20173-
Note This procedure describes the removal and installation of the fluid reservoir for the windscreen and headlamp washer system. Removal and installation of washer fluid reservoirs without headlight washer system are carried out in the same way.
Removing
- Place the vehicle on a lifting platform.
- Switch off ignition and all electrical consumers.
Vehicles without access and start authorisation system
- Remove ignition key, if fitted.
Vehicles with access and start authorisation system
- Store the ignition key outside the vehicle to prevent the ignition from being switched on unintentionally.
Continued for all vehicles
- Remove the right front wheel .
- Remove the spoiler on the front left wheel well .
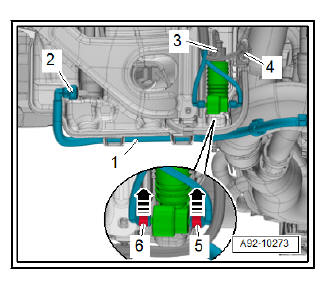
- Expose central connector -4- and disconnect.
- Unplug the electrical connector -3-.
- Place below the collecting tray - T20173- .
- Unlock lid catches -5 and 6- -Arrows- and remove the fluid lines from the windscreen washer pump.
- Press release tab and pull washer fluid hose -2- off headlight washer system pump.
- Expose water pipe -1-.
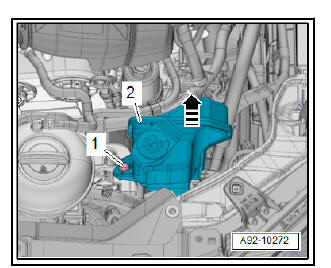
- Unscrew bolts -2, 3 and 4-.
- Remove windscreen and headlamp washer reservoir -1- from retainer -5- -arrow- and detach downwards from filler neck.
- Remove the windscreen and headlamp washer reservoir.
Installing
Installation is carried out in the reverse sequence; note the following:
- Check that sealing grommet -2- is seated correctly on windscreen and headlamp washer reservoir -3-.
Installing and removing the filler pipes of the washer fluid reservoir, vehicles with additional left cooler
Removing
- Remove filler neck for washer fluid reservoir .
- Remove washer fluid reservoir .
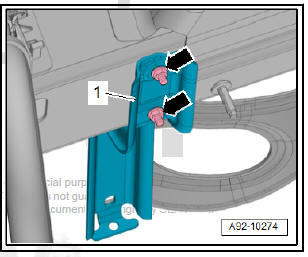
- Unscrew nuts -arrows- and detach bracket -1-.
Installing
Installation takes place in reverse order.
Installing and removing the intake of the washer fluid reservoir, vehicles with additional left cooler
Removing
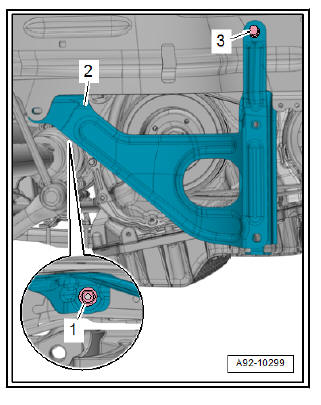
- Remove washer fluid reservoir.
- Unscrew nut -1- and bolt -3-.
- Detach mounting -2-.
Installing
Installation takes place in reverse order.
 Assembly overview - windscreen washer
system
Assembly overview - windscreen washer
system
Assembly overview - windscreen wiper system, vehicles without additional
left cooler
- Windscreen and headlamp
washer reservoir
Removal and installation
- Nut
3 Pieces
Tighte ...
 Removing and installing windscreen
washer fluid level sender
Removing and installing windscreen
washer fluid level sender
Installing and removing the fill indicators
of the washer fluid reservoir, vehicles
with additional left cooler
Special tools and workshop equipment required
Rear shelf - T20173-
Removing
...
See also:
Group 1 child seats
A suitable child seat and a correctly adjusted seat belt can
help to protect your child.
Fig. 28 A category 1
forward-facing child seat
fitted on the rear seat.
Child seats using the “ISOFIXâ ...
